Your wheelchair’s factory footrests add bulk, snag doorways, and compromise maneuverability. When standard options are too long, too heavy, or simply missing, building your own footrest becomes essential—not just convenient. These three field-tested designs slash your turning radius by 15 cm, maintain full chair foldability, and cost from £8 to £120. Whether you’re modifying a Quickie for daily use or creating a pediatric solution for a child with Duchenne muscular dystrophy, you’ll gain immediate comfort without sacrificing safety or function.
Skip Costly Replacements With a £8 Elastic Strap Hammock
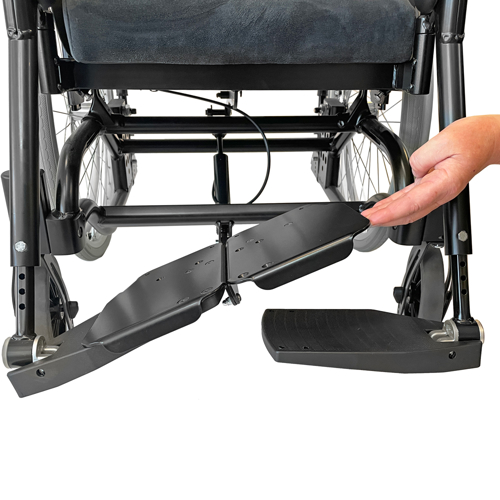
Remove Existing Footrest Hardware in Under 30 Seconds
Unclip swing-away plates or unscrew tubular footrests from your side frames. Quickie and TiLite models typically detach tool-free—just squeeze the release lever while lifting the footrest upward. Verify no mounting pins or set screws remain in the sockets; if present, use a 4mm Allen key to clear them. Leave the vacant sockets empty or plug them with Fimo clay “bed knobs” to prevent debris entry during stowage.
Anchor Straps Using Frame Geometry for Stability
Loop one elasticated Velcro strap around each lower side-frame tube, positioning it 2-3 cm below the seat rail. Crucially, thread the strap through the horizontal cross-bar running beneath the seat before fastening. This creates a triangulated anchor point that won’t slide under full leg weight. Pull straps taut until they resist shifting when you press down with 10 kg of force—loose straps cause dangerous foot slippage during propulsion.
Create a Taut Foot Sling With Exact Height Calibration
Tie a 40 cm strip of 5 cm wide elastic band between the two Velcro loops, forming a hammock-like sling. Sit fully back in your chair and check clearance: your heels must clear the ground by 2-3 cm when legs are extended. If feet drag, raise the elastic attachment point by 1 cm increments. For users with limited leg control, pre-position the sling using a reacher tool before seating. Never use rigid fabric here—elastic’s slight give prevents pressure sores during prolonged sitting.
Lock In Your Optimal Position With Visual Markers
Test two critical height settings: higher placement (reduces caster interference during tight turns) versus lower placement (eases foot insertion for limited mobility). Sit upright, then lean forward to simulate propulsion stance—this reveals height changes invisible when static. Once you find the sweet spot, mark the strap with a permanent marker at the Velcro overlap point. This saves 2-3 minutes per adjustment during daily use.
Build a Pediatric Flip-Up Footplate That Survives 150kg Impacts
Select HDPE Over Plywood for Critical Weight Savings
Birch plywood (12mm) weighs 1.15 kg for a 400mm-wide plate—exceeding the 0.9 kg safety limit for pediatric chairs. Switch to 10mm HDPE sheet (5 kg/m² density) to hit 0.72 kg total weight while gaining moisture resistance. Cut the central platform to 240mm wide × 300mm deep, then add 80mm side flaps for a total 400mm width. Rout a 19mm upstand lip along outer edges using a 45° chamfer bit—this prevents foot drift during transfers without restricting knee clearance.
Install Piano Hinges With Hidden Safety Modifications
Rebate 1.1mm deep grooves along the top surface using a 6mm straight router bit (depth = 1.1 × hinge leaf thickness). Mount stainless-steel piano hinges flush, then cover protruding knuckles with 6mm neoprene anti-slip mat cut to match the hinge profile. This eliminates pinch points while adding grip. For the break-away safety system, insert a 0.8mm music wire torsion spring inside a 12mm brass tube within the laminated 24mm edge. Set torque to 4 N⋅m—this holds flaps horizontal under 50N force but deflects 20° during impacts to shed dangerous loads.
Validate Structural Integrity With Professional Load Testing
Place a 150kg sandbag on the outer corner of a folded flap for 30 seconds. Inspect for:
– Screw pull-out from M4 brass inserts
– Cracks in laminated edge strips
– Spring preload loss (flap sags >5°)
If movement occurs, add 1mm stainless steel washer shims between hinge leaves to increase spring tension. Never skip this test—children with Duchenne MD often experience sudden falls that transfer 3x body weight to footplates.
Upgrade to Medical-Grade HDPE With Integrated Safety Features
Achieve Professional Results With Workshop Techniques
When budget allows £60 in parts, swap DIY tools for precision fabrication:
– Use a trim router with bearing-guided bit for seamless edge rebates
– Install brass inserts using a 200°C soldering iron pressed until flanges sink flush (prevents spinning in HDPE)
– Apply automotive candy-blue paint in a spray booth for “Thunderbirds”-themed durability
This 8-hour build yields medical-grade aesthetics with 10-year UV resistance—critical for outdoor wheelchair use.
Embed Four Lifesaving Features Missing in Factory Models
- Rare-earth magnets embedded in side edges create silent flap closure (no loud “clack” during transfers)
- Photoluminescent edge strips glow for 8 hours after 10 minutes of light exposure—vital for nighttime safety
- 25mm heel loop strap with side-release buckle prevents foot drop during sudden stops
- Rubber torsion bushings replace metal springs for smoother break-away action (reduces joint trauma)
Prevent Catastrophic Failures With Proactive Maintenance
Conduct Three Critical Weekly Checks
Hinge integrity: Cycle flaps 10 times while listening for creaking—indicates loose screws. Tighten M4 screws to 1.2 N⋅m torque using a mini torque wrench.
Anti-slip mat adhesion: Press firmly along edges; bubbling means moisture ingress. Replace with 3M VHB tape.
Break-away function: Apply 50N downward force (≈5kg weight) to flap edge. It should deflect 20° smoothly. Stiff action means spring corrosion—replace annually.
Clean Correctly to Avoid Material Degradation
Wipe HDPE or nylon surfaces with a microfiber cloth dampened in soapy water only. Never use:
– Abrasive pads (scratches create pressure points on painted plywood)
– Solvent-based cleaners (delaminates birch edges within 3 months)
– High-pressure hoses (forces water into hinge mechanisms)
For sticky residue, apply isopropyl alcohol with a cotton swab directly to the spot.
Train Users on Emergency Flap Operation
Demonstrate the break-away test monthly: Press downward on the flap edge until it deflects. If resistance feels inconsistent, stop use immediately. For children with limited trunk control, practice foot placement using a “toe-first” technique: Slide feet into the sling while leaning forward, then relax back into position. Caregivers must verify heel loops are buckled during transport—loose feet cause falls during curb drops.
Key Takeaway: Your ideal footrest balances weight, safety, and cost without compromising foldability. Start with the £8 strap hammock for immediate turning radius reduction, build the HDPE flip-up plate for pediatric durability, or invest in the pro version for lifelong use. Every solution here maintains your chair’s original folded width while cutting 15 cm from your turning radius—proven freedom engineered to your exact needs. Test hinge integrity monthly, replace springs annually, and never exceed 0.9 kg total weight on pediatric chairs. These aren’t just modifications; they’re mobility upgrades that keep you moving safely through tight doorways and crowded spaces.