Your wheelchair cushion cover takes a beating from daily use, spills, and wear—but replacing it doesn’t mean settling for bland medical-grade fabric. When you learn how to make a wheelchair cushion cover, you gain control over comfort, hygiene, and personal style while protecting your expensive pressure-relief cushion. Most commercial covers cost $80-$200, yet a custom version takes just 2-3 hours using accessible materials. Whether you’re refreshing a worn cover or creating seasonal designs, this guide delivers professional results without specialized skills. You’ll master fabric selection for all-day comfort, precise measurements that eliminate pressure points, and two foolproof construction methods—plus critical adjustments for ROHO® systems.
Choose the Right Fabric for All-Day Comfort
Why Eco Softshell Beats Vinyl Every Time
Skip slick, sweaty vinyl that traps heat and slides under you. Eco Softshell’s magic lies in its dual-layer design: a moisture-wicking top surface paired with cozy fleece backing that stays breathable during long sits. This fabric’s mechanical stretch moves with your body, preventing seam pressure points that cause discomfort in rigid alternatives. Crucially, it maintains waterproofing without the clammy feel of PUL (Polyurethane Laminate). Source premium rolls from Family Fabrics in the Netherlands for the widest color range, or try Spotlight NZ/OTY Fabric NZ for local availability. Custom prints let you coordinate with wheelchair accessories—turn medical equipment into a style statement.
Budget Fabric Fixes That Won’t Fail You
When funds are tight, repurpose intact shower curtains or vinyl tablecloths (check for cracks first—flaking material creates painful lumps). These work as emergency covers but lack breathability for daily use. PUL and Shower Nylon offer waterproofing at half the cost of Softshell, yet they shift under you and crease permanently within weeks. Critical mistake to avoid: Never use cotton blends—they absorb moisture, become cold when wet, and lose shape quickly. If testing budget fabrics, sit on samples for 30+ minutes to check for heat buildup or seam irritation before cutting.
The 5-Point Fabric Test Before You Cut
Don’t skip this step—uncomfortable fabric ruins even perfect construction. Before buying:
1. Sit on a folded sample for 30 minutes (mimic wheelchair posture)
2. Run your palm over seams to detect scratchy threads
3. Press fabric against bare skin for 5 minutes (check for allergic reactions)
4. Stretch diagonally to confirm 20-30% give without distortion
5. Spill water on it—true waterproof fabrics bead liquid instantly
Measure Like a Professional Fitter
Capture True Dimensions (Not Just Length/Width)
Place your cushion in the wheelchair as you normally sit—it compresses differently than on a table. Measure the widest point across the seating surface, including any contoured scoops. For depth, measure from the back edge (where your spine rests) to the front edge (calf support area). Add 2cm (¾ inch) to both measurements for seam allowances—this slight extra room prevents a tight, painful fit.
Calculate Side Strips Without Guesswork
Your side strip must wrap the cushion’s entire perimeter like a continuous band. Measure around all four sides starting/ending at the center back:
– Example: 40cm (width) × 45cm (depth) cushion with 8cm thickness
– Strip length = (40 + 45 + 40 + 45) + 2cm = 172cm
– Strip width = cushion thickness (8cm) + 2cm = 10cm
Pro tip: For contoured cushions, mark the curve peaks on your tape measure—they’ll need clipped seam allowances during sewing to prevent puckering.
Perfect Cutting Techniques for Flawless Fit
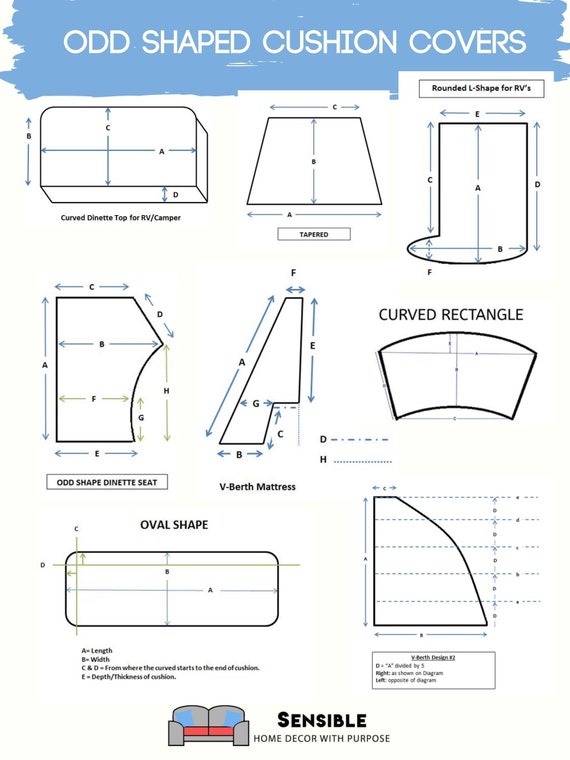
Shape Corners for Pressure-Free Sitting
Cut the top piece with slightly curved corners (like a rounded rectangle), not sharp 90-degree angles. Square corners create bulky pressure points where seams meet. For directional prints (stripes, florals), mark “TOP” on every piece with chalk—this prevents upside-down assembly. Always cut side strips on the fabric’s cross-grain for optimal stretch around curves.
Pre-Sewing Quality Check
Before stitching, verify:
– Top piece is 2cm larger than cushion on all sides
– Side strip length matches your perimeter calculation
– Directional prints align toward the front
– No hidden flaws in fabric (hold against light)
– Corners have gentle 1.5cm radius curves
FOE Construction: The Professional Finish
Join Side Strips Without Bulk
Clip strip ends right-sides together at a 90-degree angle. Stitch a 1cm seam with straight stitch, then press seams open (not to one side). For curved cushions, clip tiny notches into the seam allowance before pressing—this lets fabric bend smoothly around corners without bunching.
Attach Side to Top Without Puckering
Mark center back on top piece and side strip. Start pinning at this point, working outward toward corners. Pin every 5cm with clips (not pins—they snag stretch fabric). The side strip should overlap the top piece edge by 1cm. At curves, clip small wedges into the side strip’s seam allowance—this lets fabric ease around bends without gathers.
Apply Fold-Over Elastic Like a Pro
Turn cover right-side out. Starting at center back, overlap FOE (15-20mm width) over the raw edge. Use a triple zig-zag stitch while stretching elastic to 75% of its original length—this creates the signature gathered edge. Stop 2cm before finishing, overlap ends, and secure with tight zig-zag. Key visual cue: Elastic should sit flat against fabric without twisting.
Elastic Casing Alternative for Beginners

Create a Secure Hem Without FOE
Overlock or zig-zag raw edges first to prevent fraying. Fold fabric 1.5cm toward wrong side, then fold again 1.5cm to encase edge. Stitch close to inner folded edge, leaving an 8cm gap. Calculate elastic length: Total perimeter × 0.7 (e.g., 120cm perimeter = 84cm elastic).
Install Elastic for Perfect Tension
Thread 8-10mm elastic through casing using a safety pin. Overlap ends by 2cm and secure with 5 tight zig-zag stitches. Close the gap with matching thread. Test immediately: Sit on the cover—if elastic digs in, you stretched it too much; if loose, you need less length (try ×0.65 next time).
ROHO® Cushion Customization Secrets
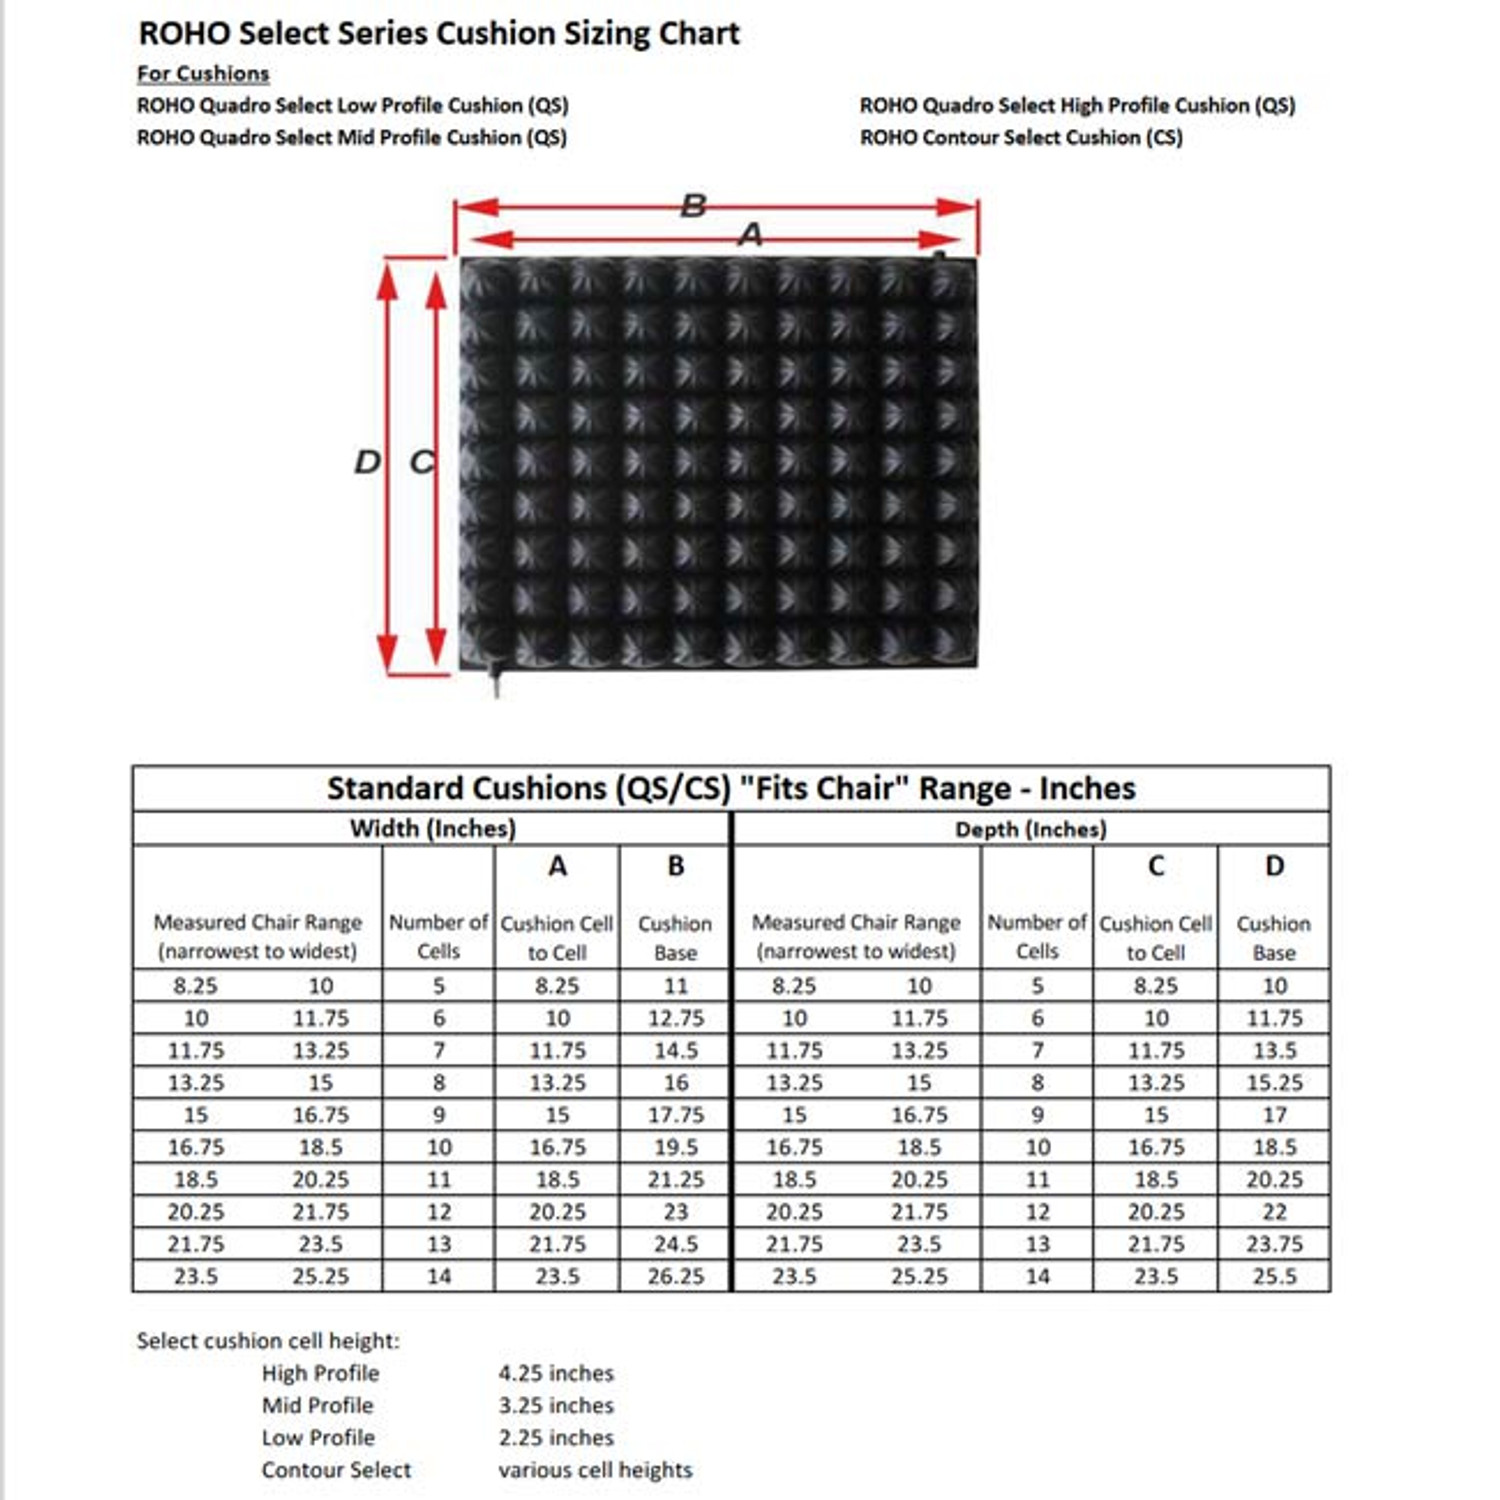
Match Cell Count to Your Wheelchair Width
ROHO® cushions size by air cells, not inches. Use this chart:
| Wheelchair Seat Width | ROHO® Cells |
|---|---|
| 10-11 inches | 5 |
| 12-13 inches | 6-7 |
| 14-15 inches | 8 |
| 16-17 inches | 9 |
| 18+ inches | 10+ |
Adapt for Complex Systems
Standard covers fit manual wheelchairs with removable cushions. For swing-away laterals, measure hardware positions before cutting side strips—create 5cm square cutouts that align with support arms. Layback wheelchairs require deeper back panels; add 3cm to the top piece’s depth measurement. Never modify fixed-cushion systems—consult a seating specialist.
Fit Testing: Eliminate Common Problems in 20 Minutes
First-Sit Evaluation Checklist
Wear the cover for 15-20 minutes while seated:
– ✅ Smooth fabric with no seam pressure on tailbone
– ✅ Elastic gathers evenly (no “ladder” gaps)
– ✅ Full lateral support movement without restriction
– ✅ Zero fabric shifting during position changes
Fix These Issues Immediately
- Too tight? Rip seams and add 0.5cm to side strip width
- Bunching at hips? Clip deeper notches into side strip seam allowances
- Elastic rolling? Replace with wider FOE (20mm) and restitch
- Print misaligned? Always mark “FRONT” on top piece before sewing
Maintenance That Doubles Cover Lifespan
Wash Without Ruining Waterproofing
Machine wash cold with mild detergent—never use fabric softener (it clogs waterproof membranes). Tumble dry on low for 10 minutes, then air dry. Hot water or high heat melts laminate layers, causing leaks. Store covers rolled loosely; folding creates permanent creases that wear thin.
Monthly Inspection Protocol
Check elastic tension by pinching gathered edges—if they don’t spring back, replace immediately. Inspect for:
– Brittle or frayed FOE (replace every 6-12 months)
– Reduced water beading (indicates failing laminate)
– Stretched seams near high-movement zones (hips/back)
Cost Breakdown: Save 70% vs. Retail
Realistic Budget Scenarios
- $0 DIY: Upcycled shower curtain + old braided elastic
- $18 mid-range: PUL fabric + standard elastic (lasts 3-6 months)
- $42 premium: Eco Softshell + FOE (2+ year lifespan)
Commercial covers cost $120-$200, yet your custom version uses identical waterproof technology. Hidden win: Perfectly fitted covers prevent cushion damage from spills, delaying $300+ replacement costs. Even at $42 materials, you break even after two commercial cover purchases.
Creating your first wheelchair cushion cover takes patience, but the payoff is immediate comfort and savings. Master these techniques, and you’ll confidently make seasonal covers, backup sets for travel, or adaptive designs for specialized wheelchairs. Remember: precise measurements prevent pressure sores, quality fabric choices keep you dry and cool, and professional finishes like FOE ensure your cover lasts years—not weeks. Start with one cover this weekend, and transform how you experience every ride.