
Struggling with steep porch steps that block wheelchair access? You’re not alone—nearly 4 million US households need home accessibility solutions, but professional ramps often cost $1,500+. The good news: how to make a cheap wheelchair ramp is simpler than you think. This guide reveals three proven budget builds—from a one-day temporary solution to a permanent structure—all under $300 using standard tools and materials. Whether you’re helping a loved one regain independence or preparing for future mobility needs, these methods deliver safe, code-compliant access without draining your wallet.
Forget complicated engineering or expensive contractors. With basic carpentry skills and strategic material choices, you can transform that inaccessible entrance in hours or days. We’ll show you exactly how to calculate dimensions, avoid costly mistakes, and leverage smart alternatives that slash prices while meeting safety standards. Let’s get started turning barriers into accessible pathways.
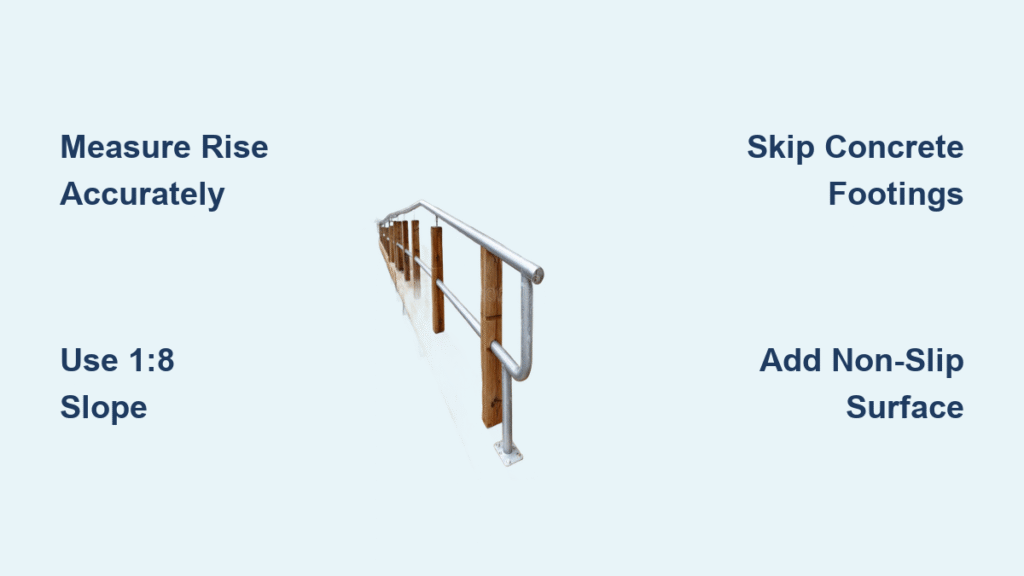
Measure Your Exact Ramp Requirements
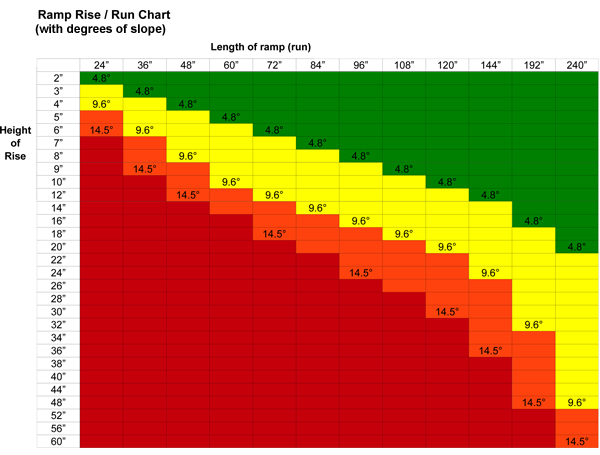
Calculate Total Rise and Slope Correctly
Start by measuring the vertical distance from your door threshold to ground level—this is your “total rise.” Place a level against the threshold and drop a plumb line to the ground for accuracy. A typical porch measures 24-31 inches high. Never guess this number—an inch of error creates dangerous slope issues. For assisted wheelchair use (attendant pushing), use a 1:8 slope (9.5° angle) instead of the stricter ADA 1:12 standard. This cuts lumber needs nearly in half: a 30-inch rise requires just 20 feet of ramp instead of 30 feet.
Determine Space-Saving Layout Options
When yard space is limited, these configurations maximize functionality:
– L-shaped ramp: Uses available width instead of depth with a single 90° turn
– Switchback design: Two 90° turns fit long ramps in narrow yards (add 60″x60″ landings at turns)
– Modular sections: Pre-cut kits snap together for tight corners without custom cutting
Critical tip: Always include 60-inch landings at direction changes and the top/bottom—this prevents wheelchair tipping during turns and meets safety codes even on budget builds.
Choose Your Budget Ramp Type
Kit Ramp: $275 Two-Hour Solution
Pre-cut lumber kits from Lowe’s or Home Depot eliminate measurement errors and work for beginners. The 16-foot straight-run kit ($275 as of late 2023) includes all hardware, non-slip surfacing, and optional handrail plans. Assembly takes just 2 hours with a helper—simply bolt pre-cut sections together using included diagrams. Key advantage: No permits required in most jurisdictions since it’s removable, and no cutting means zero material waste.
DIY Permanent Wood Ramp: $275 Long-Term Fix
Custom-building saves $100+ versus contractors while lasting 20+ years. For a 16-foot ramp with 30-inch rise, you’ll need:
– 11 pressure-treated 2x6x16′ boards ($185)
– 3 sheets 3/4″ plywood ($65)
– Concrete footings and hardware ($25)
This advanced project takes 1-2 weekends but gives full control over design and compliance. Pro tip: Build in fall when lumber yards discount summer stock for 20-30% savings.
Temporary Ramp: $220 One-Day Build
Ideal for short-term needs like post-surgery recovery, this removable ramp costs $220 and takes 6-7 hours. Use untreated lumber if under a roof (saves 30%) and skip concrete footings by anchoring to existing concrete. Must include: 2×6 wheel stops along edges and beveled ground transition for smooth rolling.
Gather Smart Material Alternatives
Essential Tools Checklist
- Circular saw or handsaw (with 9.5° angle marked on speed square)
- Drill/driver with multiple bits
- 4-foot level and tape measure
- Safety glasses and work gloves
Budget Material Swaps
- Plywood alternative: OSB decking cuts costs by 40% ($15/sheet vs $25)
- Untreated lumber: Save 30% if ramp stays dry (lasts 10-15 years under cover)
- Reclaimed wood: Check local Facebook Marketplace for free deck removals
Warning: Never skip non-slip treatment—grip tape ($15) prevents dangerous slips in rain or snow.
Build a Temporary Ramp in One Day
Morning Setup (Hour 1)
- Stage materials on driveway for easy access—pre-cut all lumber using speed square set to 9.5°
- Mark post locations every 4 feet with spray paint
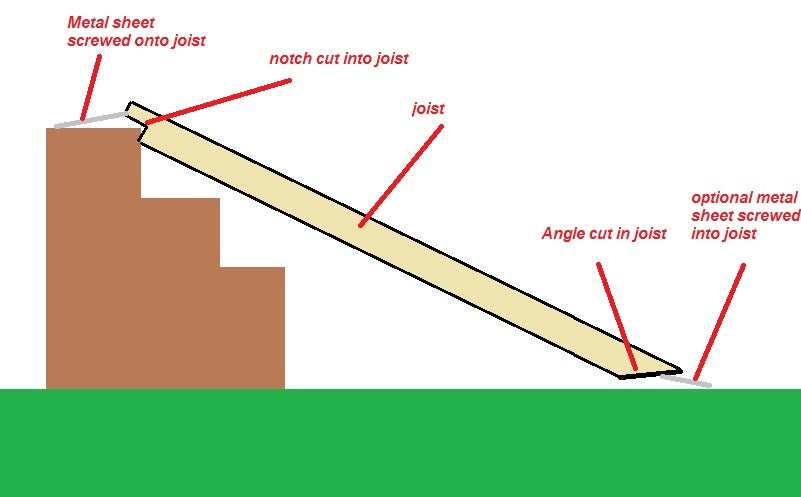
- Build the landing platform first using 2×6 frame on 4×4 legs—this establishes your reference height
Frame Construction (Hours 2-4)
- Install joists 16″ apart with joist hangers
- Constantly check slope with 4-foot level—adjust leg heights until consistent
- Add cross-bracing every 4 feet for wobble prevention
Decking and Safety (Hours 5-7)
- Screw down OSB sheets every 8″ starting at the top
- Install 2×6 wheel stops along both edges (critical for safety)
- Bevel the ground-contact edge with circular saw for smooth transition
Time-saver: Build directly on concrete surfaces to skip footing work—cuts 2+ hours off timeline.
Assemble a Kit Ramp in 2 Hours
Pre-Assembly Checklist
- Inventory all parts—kits include pre-drilled lumber, bolts, and non-slip surfacing
- Sort pieces by size using included diagrams
- Position base sections before bolting—dry-fit to avoid misalignment
Speed Assembly Tips
- Connect base sections using provided bolts (have helper hold pieces steady)
- Add vertical supports at each joint for rigidity
- Snap decking panels into place—the pre-drilled holes align automatically
- Attach handrails using included ADA-compliant plans (required for rises over 6″)
Pro move: Order kits with threshold connectors for seamless door access—adds $20 but prevents tripping hazards.
Ensure Permanent Ramp Safety
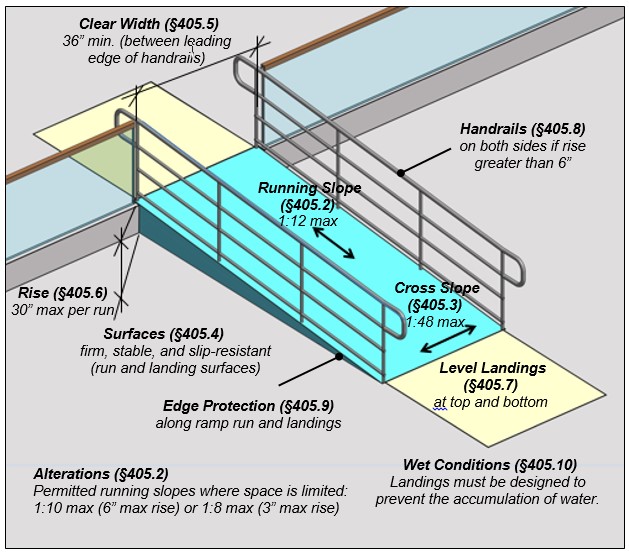
Critical Compliance Requirements
- Handrails mandatory if ramp rises over 6 inches—install at 34-38″ height
- Landings every 30″ of rise (60″ x ramp width) for rest points
- Minimum 36″ width between handrails—42″ overall for clearance
Avoid Costly Mistakes
- Slope too steep: Even 1° steeper than 9.5° creates wheelchair tipping risk—re-measure with digital level
- Weak landings: Top landing must support 300+ lbs where door swings open
- Missing permits: Check local codes—many exempt ramps under 30″ rise
Weatherproofing must-dos:
– Gap decking 1/4″ for drainage
– Apply wood preservative to all cut edges
– Add grit tape in high-traffic zones
Maximize Ramp Longevity
Annual Maintenance Routine
- Inspect screws for looseness (re-tighten every spring)
- Check ground contact points for rot—replace affected sections immediately
- Reapply non-slip coating when surface becomes smooth
- Clear vegetation from ramp sides to prevent moisture trapping
Extend Wood Life Cheaply
- Paint underside with oil-based primer before assembly (adds 5+ years)
- Redirect downspouts away from ramp with $10 PVC elbows
- Seal cut ends yearly with Thompson’s WaterSeal ($8)
Untreated wood hack: Apply boiled linseed oil annually—it penetrates deeper than paint for better moisture protection.
Final Cost-Saving Strategies
$200 Temporary Ramp Breakdown
- Untreated lumber: $150
- Basic hardware: $35
- Non-slip strips: $15
- Total: $200 (3-5 year lifespan)
$275 Permanent Ramp Formula
- Pressure-treated lumber: $225
- Concrete footings/hardware: $50
- Total: $275 (20+ year lifespan)
Hidden costs to budget:
– Building permits: $50-150 (call local office first)
– Tool rental: $25 for concrete mixer if doing footings
– Lumber delivery: $75 (but often free with $300+ orders)
Building a wheelchair ramp doesn’t require professional skills or massive budgets. By choosing the right design for your needs and using these proven cost-cutting techniques, you’ll create safe, dignified access for under $300. Start measuring your rise today—your first step toward independence costs less than you think. Remember: The cheapest ramp isn’t the one with the lowest price tag, but the one that keeps your loved one moving safely for years to come.


