
Struggling with a seat that’s too high makes every transfer feel like a precarious climb. If your feet dangle when seated or you wobble during transfers, your wheelchair seat height likely needs adjustment. Improper seat height doesn’t just cause discomfort—it compromises stability, increases fall risk, and strains your posture throughout the day. This guide reveals exactly how to lower your wheelchair seat safely, whether you need a minor tweak or significant modification. You’ll discover manufacturer-approved techniques, professional adjustment methods, and critical safety checks that ensure your mobility equipment works with your body, not against it.
Determine Your Exact Seat Height Requirements
Before touching any adjustment mechanisms, you need precise measurements to avoid making your chair unusable. Guessing can lead to poor posture, pressure sores, and dangerous instability during transfers. The ideal seat height allows your feet to rest flat while maintaining a 90-degree knee angle—a critical factor for proper circulation and pressure distribution.
Measure Your Perfect Seat Height in 4 Steps
Follow this measurement protocol to get accurate results:
– Sit on a firm chair with feet flat on the floor
– Measure from the floor to the crease behind your knee
– Subtract 1-2 inches for footrest clearance if applicable
– Record this number as your target seat height
Critical measurement tip: Always measure while wearing your most common footwear, as shoe thickness significantly impacts the final calculation. For users with leg length discrepancies, measure both sides and use the shorter measurement as your baseline.
When to Consult a Mobility Specialist
Attempting major seat height reductions without professional guidance risks creating more problems than you solve. Schedule a consultation with a certified mobility specialist if:
– You need more than 2 inches of lowering
– You experience pain during transfers
– Standard adjustment mechanisms don’t provide enough range
– You have pressure sores or circulation concerns
These experts can assess whether your specific wheelchair model supports safe modification or if alternative solutions better suit your needs.
Execute Standard Seat Height Adjustments Properly
Most wheelchairs offer built-in adjustment options that can lower your seat by 1-3 inches—enough to solve many common height issues. These modifications maintain your chair’s structural integrity while requiring minimal tools and technical expertise.
Reposition Your Seat Frame Correctly
This common adjustment method works on many folding wheelchair models:
- Lock the wheelchair brakes and remove the seat cushion
- Locate the mounting points where the seat canvas attaches to the frame
- Unhook or unscrew the seat from current position (typically 4 attachment points)
- Move the seat attachment points to the lower holes or brackets
- Reattach securely, ensuring even tension on both sides
- Test the seat for stability before adding the cushion back
Warning: Uneven tension causes premature wear and uncomfortable seating—always check both sides with a level before finalizing.
Modify Support Brackets Without Compromising Safety
Some wheelchairs feature adjustable brackets at each corner of the seat frame:
- Identify the seat support brackets (usually with multiple height positions)
- Loosen the bracket bolts using the appropriate wrench size
- Slide brackets down to the next lower position while maintaining alignment
- Tighten bolts to manufacturer specifications (typically 15-20 ft-lbs)
- Test the seat for stability by applying weight gradually
Pro tip: Apply thread-locking compound to bolts after adjustment to prevent loosening from daily vibration.
Replace Components for Subtle Height Reduction
When frame adjustments aren’t possible, component swaps create small but meaningful changes:
- Install low-profile cushions (1-2 inches thinner than standard)
- Replace standard foam with high-density alternatives that compress less
- Use thinner seat covers without padding layers
- Consider custom-cut foam inserts that maintain support while reducing height
Implement Major Height Reductions Safely
When standard adjustments don’t provide enough lowering, professional modifications become necessary. These changes require technical expertise but can achieve significant height reductions while maintaining safety.
Professional Frame Modification Process
Certified technicians perform these specialized modifications:
- Cutting and rewelding frame tubes to precise specifications
- Installing custom shorter support posts matched to your weight capacity
- Replacing standard wheels with smaller diameter options (if frame allows)
- Rebalancing the center of gravity to prevent tipping hazards
Important: Never attempt frame cutting yourself—improper modifications create dangerous structural weaknesses that may fail during use.
Aftermarket Lowering Kits Installation Guide
Manufacturer-specific kits provide the safest path for significant lowering:
- Verify kit compatibility with your exact wheelchair model
- Ensure professional installation to maintain warranty coverage
- Confirm all components meet ISO safety standards
- Request documentation of the modification for future reference
Most kits include pre-engineered components that maintain structural integrity while achieving 3-4 inches of height reduction.
Perform Critical Safety Checks After Modification
Every seat height adjustment affects your wheelchair’s stability and functionality. Skip these verification steps at your peril—improperly lowered chairs cause thousands of preventable falls annually.
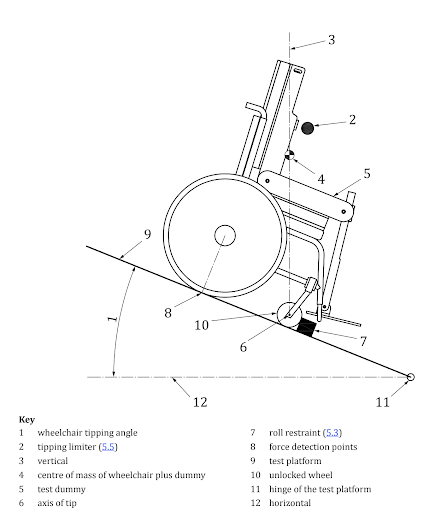
Stability Testing Protocol You Must Complete
Before using your modified wheelchair independently:
– Perform transfers on level ground with assistance present
– Test forward stability by leaning toward your knees (should not tip)
– Check sideways stability when reaching for objects
– Verify the chair remains stable when brakes are applied
– Test on both indoor and outdoor surfaces
Red flag: If the chair tips when leaning forward just 4 inches, the seat is too low for safe transfers.
Ground Clearance Verification Steps
Maintaining adequate ground clearance prevents constant snagging:
– Measure from the lowest frame point to the ground (should be 1.5-2 inches minimum)
– Test navigation over common obstacles like door thresholds
– Verify anti-tip bars (if present) still function correctly
– Check that wheel rotation isn’t obstructed by frame components
Troubleshoot Common Lowering Problems Immediately

Even careful adjustments can create unexpected challenges. Address these issues before they cause injury or equipment damage.
When Footrests No Longer Align Properly
If your feet don’t rest flat after lowering:
– Recalculate leg rest length based on new seat-to-floor measurement
– Install adjustable footplates that extend further forward
– Modify heel loops to maintain proper foot positioning
– Verify footrest angle accommodates your leg length
Expert note: Improper foot positioning causes circulation problems—never ignore this issue.
If Brakes Become Hard to Reach
Lowering the seat often affects brake accessibility:
– Reposition brake handles to lower mounting points if available
– Install brake extension levers designed for your model
– Consult the manufacturer for model-specific modification options
– Never modify brake components yourself—this compromises safety
When Armrests Interfere with Movement
Lowering the seat can make armrests too high:
– Replace standard armrests with shorter versions
– Remove spacers or use low-profile mounting hardware
– Install flip-back arms for easier transfers
– Ensure arm support maintains proper shoulder alignment
Maintain Your Optimal Seat Height Long-Term
Your ideal seat height isn’t static. Changes in your body, footwear, or mobility patterns may require periodic reassessment to prevent discomfort and injury.
When to Reassess Your Seat Height
Schedule measurements when you notice:
– Increased difficulty during transfers
– New pressure points or discomfort
– Consistent use of different shoe styles
– Changes in your physical strength or flexibility
– Modifications to your transfer technique
Preventive practice: Measure seat height every 3 months even if no issues appear.
Component Adjustment Checklist
After any seat height change, recalibrate these elements:
– Leg rest length and angle (critical for circulation)
– Footplate positioning (prevents foot drop)
– Armrest height (maintains shoulder health)
– Back support positioning (ensures proper spinal alignment)
– Wheel camber settings (affects propulsion efficiency)
Lowering your wheelchair seat transforms your daily mobility experience when done correctly. Whether you need a simple 1-inch adjustment or professional frame modification, following these verified methods ensures you achieve optimal height safely. Remember that precise measurements, proper technique, and thorough safety verification separate successful modifications from dangerous mistakes. Your wheelchair should enhance your independence—not create new challenges. Take the time to get your seat height right, and you’ll enjoy smoother transfers, better stability, and improved comfort throughout your day.


