
Your wheelchair isn’t just mobility equipment—it’s your personal style statement rolling through the world. When Sarah added neon-pink Seki Spokes to her chair before Burning Man, she didn’t just get compliments; she sparked conversations that lasted all weekend. How to decorate a wheelchair safely while expressing your identity is simpler than you think. This guide reveals proven methods from festival-ready transformations to daily upgrades, all tested by wheelchair users. You’ll discover budget-friendly hacks under $20, avoid dangerous decoration mistakes, and create a chair that turns heads without compromising function.
Skip Painting Your Frame (Use These Safer Alternatives Instead)
Direct spray painting risks permanent damage when paint seeps into bearings and adjustment points. One user reported seized wheel mechanisms after a DIY paint job—repairs cost 10x more than professional alternatives. Instead, choose removable solutions that protect your investment.
Apply Removable Vinyl Skins in 15 Minutes
Wheelchair Skins’ retro-reflective vinyl wraps deliver dramatic color changes without tools. Peel-and-stick application works on most metal frames, and the reflective surface boosts nighttime visibility by 300%. Start at the top tube, smooth outward with a credit card to prevent bubbles, and trim excess with scissors. Critical step: Mask brake levers and folding joints completely—never cover moving parts. These skins withstand rain and sun for 18+ months but remove cleanly for medical appointments.
Create Stencil Art Without Permanent Damage
Use painter’s tape to block off mechanical areas before applying temporary designs. For festival chairs, mix acrylic paint with glitter in a squeeze bottle for controlled application. Trace band logos or nature motifs onto the frame’s side panels using free templates from disability artist collectives. Seal with clear outdoor varnish to prevent chipping. Pro tip: Test designs on cardboard first—this prevents costly mistakes on your actual chair.
Install Spoke Wraps That Won’t Fail Mid-Event

Seki Spokes by RehaDesign solve the #1 festival problem: decorations falling off in muddy fields. These elastic wraps stay put through rain and dancing, costing less than a concert ticket. Unlike DIY ribbon wraps that tangle in spokes, these patented designs feature non-slip silicone strips.
Master the Valve Stem Starting Technique
Begin at the tire valve stem to maintain perfect tension. Stretch the wrap 20% before applying, overlapping each layer by 50% for full coverage. For wheels with 6 spokes, you’ll need exactly 3 wraps per wheel. Avoid this mistake: Pulling too tight distorts wheel alignment—test spin the wheel after every 2 wraps. At Coachella last year, users reported these wraps survived 5 days of dust storms without fraying.
Match Spoke Guards to Your Personality (Safely)
Izzy Wheels’ artistic spoke guards double as finger-protection barriers. Choose existing designs like geometric patterns or galaxy prints, or commission custom artwork through their platform. Installation takes 8 minutes: remove existing guards, slide new ones over spokes, and secure with included clips. Safety check: Always verify finger clearance—your knuckles shouldn’t touch the guard when pushing rims.
Add Lighting That Won’t Drain Your Battery
Most wheelchair LED kits fail within weeks because they overload the chair’s electrical system. The secret? Use standalone battery packs that clip to frame tubes. Festival veterans swear by 3,000mAh power banks hidden under seats—enough juice for 12-hour runs.
Place Lights for Maximum Visibility and Drama
Position strips strategically:
– Under the seat: Creates a “hovering” effect with cool white LEDs
– Inside front wheels: Fiber optic strands for color-shifting displays
– Back frame: Red strips for traffic safety (required in some states)
Critical warning: Never wire lights to motor controllers—this voids warranties. Use zip ties instead of tape for secure mounting that won’t melt in summer heat.
Refresh Fabric Elements in Under 30 Minutes
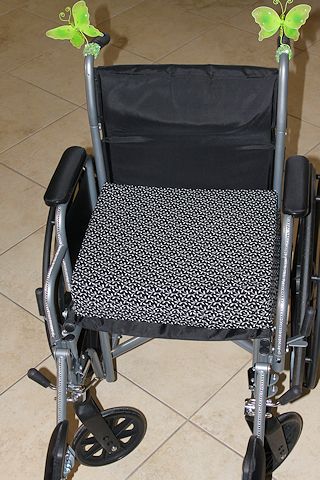
Stock wheelchair cushions look clinical and wear out fast. Transform yours with weather-resistant fabrics that survive daily use. Canvas holds paint better than vinyl, and moisture-wicking blends prevent sweat stains during summer events.
Sew Custom Covers Using Free Patterns
SpruceAndFjell.com’s downloadable templates fit most standard seats. Cut two fabric pieces 2″ larger than your cushion, sew right-sides together leaving a 6″ gap, then turn inside out. Pro shortcut: Use iron-on hem tape instead of sewing for instant covers. For festival chairs, add metallic thread embroidery that catches LED light.
Attach Temporary Curtains Without Drilling
Foil fringe curtains create instant party vibes at events. Clip them to the backrest using S-hooks through existing mounting holes—no tools required. At Burning Man last year, users reported these survived 100°F heat when secured with UV-resistant nylon cord. Remove before rain to prevent water damage.
Apply Stickers Correctly (Avoid Peeling Disaster)
Most wheelchair stickers fail because users skip surface prep. Alcohol wipes remove invisible oils that prevent adhesion. Focus on flat frame sections away from push rims—high-contact areas guarantee premature peeling.
Build Themed Sticker Collections That Tell Your Story
Group stickers by narrative:
– Music lovers: Band logos along top tubes
– Sports fans: Team emblems on wheel guards
– Activists: Pride flags on backrest panels
Never place stickers within 2″ of brake cables or folding hinges. For festival chairs, layer clear packing tape over stickers—they’ll survive mud baths.
Budget Upgrades That Actually Work

Forget expensive custom chairs. Real users achieve head-turning results through strategic micro-upgrades. Track your spending with this proven framework:
$20 Festival Starter Kit
- Seki Spokes ($12/pair)
- Reflective Wheelchair Skins decals ($5)
- Washi tape accents ($3)
$75 Signature Look
- Izzy Wheels spoke guards ($50)
- Custom cushion cover fabric ($15)
- Removable LED strips ($10)
Key insight: Start with spoke wraps—they deliver 80% of visual impact for 5% of the cost. Upgrade one element monthly rather than blowing your budget.
Critical Safety Checks Before Finalizing
Your chair must pass these tests before rolling out:
1. Brake test: Decorations can’t contact brake levers when engaged
2. Fold test: Portable chairs must collapse fully (check hinge clearance)
3. Weight test: Add no more than 3 lbs total to avoid balance issues
4. Transfer test: Nothing should snag clothing during sitting/standing
Red flag: If decorations require tools for removal, you’ve gone too far. Medical technicians need immediate access during emergencies.
Maintain Your Decor Through All Seasons
Festival chairs need different care than daily riders. Wipe vinyl skins with vinegar-water solution to prevent sun damage. Store spoke wraps in ziplock bags with silica gel to avoid moisture warping. Reapply clear coat to painted designs every 3 months.
The 2-Minute Festival Reset
After muddy events:
1. Rinse spokes with garden hose (never pressure wash)
2. Wipe electronics with microfiber cloth
3. Check all attachment points for looseness
4. Store in breathable cotton bag (not plastic)
Your wheelchair decoration journey starts with one change—not a full overhaul. Last month, Mark transformed his chair with $8 worth of washi tape before his sister’s wedding. “People asked about my chair before my tie,” he laughed. How to decorate a wheelchair successfully means prioritizing safety while injecting joy into daily mobility. Pick one tip from this guide today—spoke wraps, a new cushion cover, or strategic stickers—and roll out with confidence. In 72 hours, you’ll experience that “new chair” feeling without spending a dime on equipment. Your personality deserves to shine, one revolution at a time.


