
Your 90-pound German Shepherd stumbles on morning walks, hips swaying, rear legs dragging. The vet confirms degenerative myelopathy, and commercial wheelchairs cost $500-$900—far beyond your budget. Don’t let your dog’s mobility decline define their golden years. This guide shows you exactly how to build a dog wheelchair for a large dog using $125-$195 in materials, engineered specifically for 60-200 pound breeds. You’ll create a stable, medical-grade cart that supports your dog’s unique gait while preventing injury.
Unlike flimsy small-dog designs, large-breed wheelchairs demand precision engineering to handle torsional stress and prevent rollover. I’ll walk you through critical measurements that avoid paw interference, material choices tested for 150+ pound loads, and safety checks missing from generic tutorials. Whether your Labrador needs rear support or your Mastiff requires full-body assistance, this build adapts to your dog’s condition in one afternoon.
Match Wheelchair Design to Your Dog’s Specific Weakness
Rear-Support Cart for Hind-Limb Paralysis
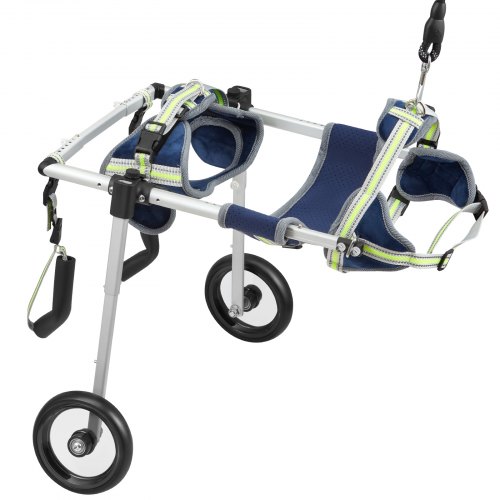
Build this when rear legs are paralyzed but front legs remain strong. The frame positions wheels behind your dog’s hips, supporting 65% of body weight through a pelvic sling under the ischial arch. Critical for large breeds: Extend the wheelbase 10% beyond your dog’s natural stride to prevent front-paw interference during movement. German Shepherds and Golden Retrievers typically need 14-16″ wheels for this configuration.
Front-Support Cart for Forelimb Weakness
Choose this design when front legs weaken but rear legs function normally. Wheels mount under the chest with a padded Y-strap across the sternum and shoulder blades. Shorten the wheelbase by 15% to maintain rear paw contact with the ground—essential for Boxers or Great Danes with front-leg arthritis. Never use this for dogs with spinal injuries; consult your vet first.
Full-Support Quad Cart for Total Weakness
Build four-wheel configurations only when all limbs show weakness. This design balances weight across chest and pelvic supports but requires exact center-of-gravity calculations. For large dogs over 100 pounds, position the rear axle 25% farther back than the front axle to prevent tipping during turns. Avoid this build if your dog weighs under 80 pounds—excess frame weight causes fatigue.
Precisely Measure Your Large Dog for Frame Stability

| Measurement | How to Measure | Critical Tolerance |
|---|---|---|
| Floor-to-Groin | Standing dog: ruler from floor to belly crease | ±5mm |
| Hip Width | Widest point across hip bones (iliac crests) | ±5mm |
| Wheelbase | Lying dog: tape from front toe pad to rear heel | ±10mm |
| Chest Depth | Sternum to spine between shoulder blades | ±5mm |
Calculate frame dimensions using these formulas:
– Frame height = Floor-to-groin minus 65% of wheel radius
– Frame width = Hip width plus 80mm clearance (40mm each side)
– Wheel track = 1.1 × hip width
Example: For a 100-pound Labrador with 18″ floor-to-groin and 10″ hip width:
– Frame height = 18″ – (14″ wheel × 0.65) = 8.9″
– Frame width = 10″ + 3.15″ = 13.15″
Select Heavy-Duty Materials for Large-Dog Loads

PVC Build (60-90 Pounds: Budget Option)
Use 1¼” furniture-grade Schedule-40 PVC pipe for dogs under 90 pounds. Pros: $18 total cost, no special tools, corrosion-proof. Cons: Flexes under heavy loads—requires weekly joint inspections. Max safe load: 75 pounds. Never use thin-walled plumbing PVC; it cracks under torsional stress from large breeds.
Aluminum Build (90-150 Pounds: Strength Option)
Choose 1″ OD × 1/16″ wall 6061-T6 aircraft aluminum for dogs over 90 pounds. Pros: Rigid under load, lightweight, professional appearance. Cons: $45 tubing cost, requires welding or riveting. This handles 150-pound static loads without flex—critical for Labradors and Rottweilers. Always add ⅛” aluminum axle plates to prevent wheel wobble.
Steel Build (150+ Pounds: Maximum Strength)
For Mastiffs or Saint Bernards over 150 pounds, use 1″ galvanized EMT conduit. Pros: Won’t flex under 200-pound loads. Cons: Heavy (adds 8+ pounds to frame), may rust, difficult to modify. Only attempt if you have metal-cutting tools—this option triples assembly time.
Build a PVC Wheelchair for Large Dogs in 6 Steps
Required Materials
- PVC: 24″×2, 16″×2, 8″×4, 6″×2 pipes
- Fittings: 4-way crosses×2, 90° elbows×4, tees×2, caps×4
- Wheels: 14″ pneumatic tires with ⅝” axles
- Hardware: M8×60mm bolts, nyloc nuts, cotter pins
Critical Assembly Process
1. Dry-fit before gluing: Assemble all joints without solvent cement. Place your dog in the frame to check clearance—front legs must clear uprights by 2+ inches during full stride.
2. Reinforce axle points: Slide 6″ axle sleeves into 4-way crosses. Glue caps only on sleeve ends to prevent axle movement—never glue wheel joints.
3. Create cross-bracing: Connect side frames with 16″ pipes at front/rear tees. This prevents frame twist when your dog turns—a common failure point in large-dog builds.
4. Install harness anchors: Drill ¼” holes in uprights 2″ below frame top. Attach D-rings with M8 bolts, allowing ±4″ strap adjustment for seasonal coat changes.
5. Test for paw drag: With your dog standing in the cart, ensure rear paws clear the ground by ½ inch. Raise axles in ½” increments if knuckling occurs.
6. Final safety check: Place 150 pounds (1.5× dog weight) on the frame for 10 minutes. Joints shouldn’t deflect more than 3mm.
Aluminum Build: Precision Steps for 90+ Pound Dogs
Why Aluminum Wins for Large Breeds
PVC flexes under 90-pound loads, but aluminum maintains rigidity where it counts—critical for German Shepherds with degenerative myelopathy. The 6061-T6 alloy handles 150-pound loads without sagging, reducing pressure sores from uneven weight distribution.
Key Fabrication Upgrades
- Miter corners at 45° for professional joints that resist twisting
- Rivet axle plates (never bolt)—vibration loosens bolts on large-dog walks
- Press 6201-2RS sealed bearings into wheels to prevent sand/grit damage
- Add reflective tape strips along frame rails for nighttime visibility
Pro tip: Anodize the frame after assembly. Uncoated aluminum scratches easily against your dog’s nails, creating sharp edges that could cause injury.
Integrate the Harness System for Safe Weight Distribution
Critical Support Points
- Pelvic sling must sit under the ischial arch (not the tailbone) to carry 65% of body weight without restricting breathing.
- Chest plate requires 2″ wide padded webbing across the sternum—narrow straps dig into shoulder blades.
- Girth strap needs a quick-release buckle to prevent lateral sway during turns.
Safety Check Protocol
- 15-minute walk test: Watch for harness rub points behind elbows or hips.
- Weight distribution: Your dog should lift their head naturally—no hunched posture.
- Range of motion: Front legs must clear the frame during full extension. Add neoprene padding to any contact points.
Perform Critical Safety Adjustments Before First Use
| Issue | How to Fix It | Large-Dog Consequence |
|---|---|---|
| Wheel toe-in/out | Shim axle plates with washers | Causes uneven tire wear and instability |
| Frame twist | Re-square joints with carpenter’s square | Makes dog drag one side, worsening injury |
| Low ground clearance | Raise axles in ½” increments | Paw knuckling leads to sores and infection |
Never skip load testing: Place 1.5× your dog’s weight on the frame for 10 minutes. If deflection exceeds 3mm, reinforce cross-bracing. Then conduct a 10-meter straight walk observing gait symmetry—limping means improper weight distribution.
Maintain Your Large Dog’s Wheelchair for Longevity
Weekly:
– Check pneumatic tire pressure (30-35 PSI)
– Inspect bolts for loosening—large dogs generate vibration that backs out fasteners
– Clean frame with damp cloth to remove hair/debris
Monthly:
– Rotate wheels to even tread wear
– Re-grease wheel bearings (use marine-grade grease)
– Check harness webbing for fraying near attachment points
Replace harnesses every 3 months—sweat and dirt weaken nylon straps faster under heavy loads.
When to Skip DIY and Buy Professional
Build your own only if:
– Your dog weighs under 150 pounds
– You have fabrication tools (saw, drill, measuring tools)
– Your vet approved the design for your dog’s condition
Choose a commercial wheelchair ($400-$700) if:
– Your dog exceeds 150 pounds
– They have complex conditions like spinal fractures
– You lack welding/cutting tools
– Your dog shows aggression during fittings
Professional carts include expert fitting—worth the cost for dogs with severe mobility issues.
Your large dog’s mobility journey starts today. Build the PVC version for quick relief, then upgrade to aluminum as skills grow. This wheelchair isn’t just hardware—it’s freedom for your best friend to chase squirrels, greet neighbors, and enjoy life again. Measure twice, cut once, and give your 100-pound companion the mobility they deserve.


