A wheelchair that creeps forward during transfers or refuses to release can turn routine movements into dangerous situations. When your brakes slip on inclines or stick when you need smooth rolling, immediate adjustment becomes critical for safety and independence. This guide delivers precise, wheelchair-specific techniques to diagnose and fix brake issues across all common systems—no professional help required for most adjustments. You’ll learn exactly how to tighten loose locks, free stuck mechanisms, and test your work like a certified technician, all using basic tools found in most homes.
Identify Your Wheelchair Brake Type Immediately
Push/Pull Locks dominate standard manual wheelchairs, especially pediatric models. Look for levers you push down or pull up to clamp a bar against the tire. These systems allow users to leverage body weight for engagement, making them ideal for limited-strength users. Scissor Locks sit flush against the frame when disengaged, featuring interlocking arms that grip the wheel rim. Active users prefer these since they clear fingers during propulsion but demand precise alignment. Hub Locks operate internally through the wheel axle with visible extension levers for accessibility. Transport Chair Brakes typically use squeeze levers or push-down handles with tool-free adjustment knobs—common on chairs designed for caregiver operation.
Spot Critical Brake Issues Before Adjusting
Warning Signs Your Brakes Need Attention
- Rolling on inclines even when brakes appear engaged
- Loose lever wobble requiring excessive force to lock
- Dragging resistance when wheels should spin freely
- Asymmetrical performance where one brake works but the other fails
Perform This 30-Second Safety Check
- Engage both brakes on level ground
- Gently push the chair forward and backward
- Verify zero wheel movement under light pressure
- Release brakes and spin wheels to check for smooth rotation
- Listen for grinding that indicates misalignment or debris
Never skip this test—improperly adjusted brakes cause 23% of transfer accidents according to safety studies.
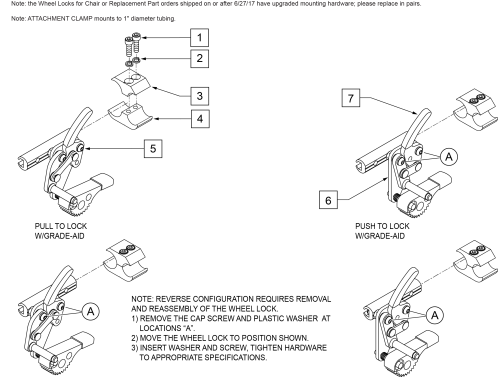
Adjust Push/Pull Wheel Locks Step-by-Step
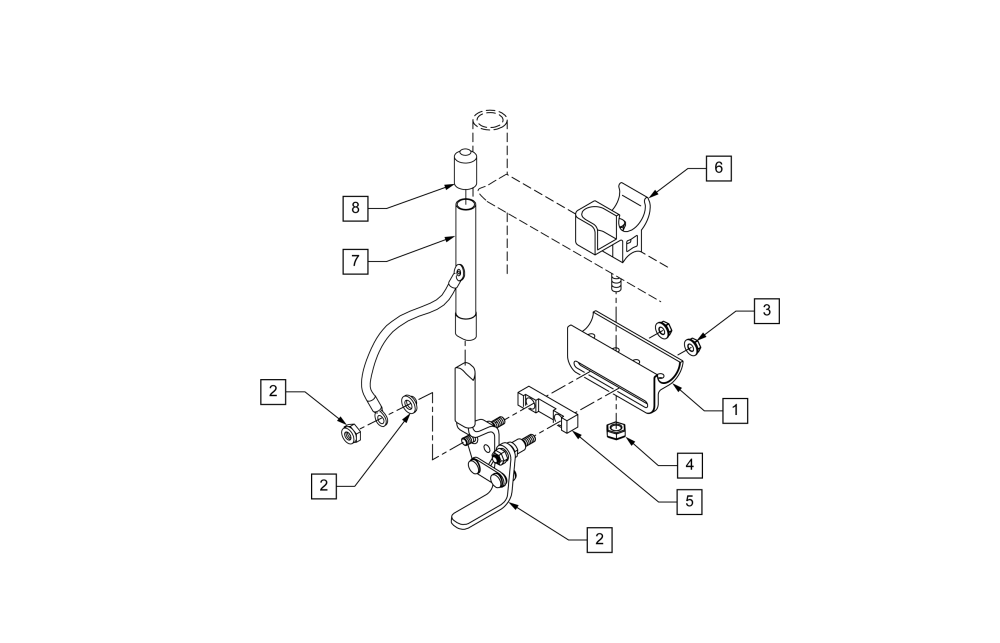
Locate Critical Adjustment Points
Find the mounting screws where the brake bar connects to the wheelchair frame—usually near the tire’s top edge. These screws control how close the brake pad presses against the tire. Avoid touching the brake cable unless specifically designed for cable adjustment, as this can throw off tension balance.
Tighten Slipping Brakes Correctly
- Turn screws clockwise in quarter-turn increments using a Phillips screwdriver
- Test engagement after each adjustment by pushing the lever down firmly
- Stop when the pad grips the tire without deforming the rubber
- Check for even pressure by spinning the wheel—uneven contact causes jerky stops
Over-tightening cracks tire sidewalls within weeks. If the tire bulges visibly against the pad, loosen immediately.
Free Stuck Brakes Without Damage
- Turn screws counterclockwise in eighth-turn increments
- Verify 1-2mm clearance between pad and tire when released (use a business card for measurement)
- Test roll resistance—wheels should spin freely for 3+ rotations
- Lubricate pivot points with silicone spray if levers feel stiff
Fix Transport Chair Lever Brakes Fast
Master Tool-Free Knob Adjustments
Most transport chairs feature adjustment knobs on the brake lever:
1. Turn knob clockwise to increase braking force (tighten)
2. Turn counterclockwise to reduce engagement effort
3. Test by squeezing lever—it should lock with firm but comfortable pressure
4. Aim for 1/4″ lever travel before full engagement; less causes premature wear
Handle Screw-Based Systems
When knobs aren’t present:
1. Loosen the pivot screw with a 3mm hex key
2. Slide the lever assembly toward the wheel for tighter grip
3. Tighten screw to 25 inch-pounds (snug but not straining the plastic housing)
4. Confirm lever returns fully when released—sticking indicates over-tightening
Calibrate Push-to-Lock Handles Precisely
Reposition Handle for Optimal Leverage
- Locate the mounting nut beneath the push handle (typically 10mm)
- Loosen nut slightly with an adjustable wrench
- Slide assembly toward the wheel until pad touches tire when handle is down
- Tighten nut securely while holding position—loose mounts cause dangerous slippage
Align Worn Brake Pads
When handles feel weak despite proper positioning:
1. Remove pad mounting screws (usually 2.5mm hex)
2. Clean metal backing plates with isopropyl alcohol
3. Reinstall pads ensuring even contact across the tire surface
4. Replace pads if grooved deeper than 1/16″ or showing metal backing
Hub Lock Adjustments for Safety-Critical Systems
Optimize Extension Lever Reach
- Tighten mounting bolts if the lever wobbles during engagement
- Adjust angle by loosening the clamp bolt until lever points toward your hand
- Position for natural reach—your thumb should hit the lever without straining
- Test from seated position to confirm full lock engagement with minimal effort
Verify Internal Mechanism Function
While hub locks rarely need adjustment, check:
– Audible “click” when fully engaged
– Zero wheel play when locked (test by rocking chair side-to-side)
– Complete release—wheels spin freely without resistance
If any function fails, seek professional service immediately—internal hub repairs require specialized tools.
Test Adjustments Like a Certified Technician
Conduct Level Ground Validation
- Find non-slip flooring like tile or concrete (avoid carpets)
- Engage both brakes using your normal transfer technique
- Apply 10+ pounds of force pushing forward—chair must not move
- Check release smoothness—levers should spring back fully within 1 second
Simulate Real Transfer Stress
- Position chair at transfer angle (e.g., near bed or toilet)
- Lock brakes as you would before standing
- Apply body weight through the transfer motion
- Watch for any chair movement—even 1/2″ roll indicates dangerous looseness
Prevent Future Brake Failures Proactively
Implement Weekly Maintenance
- Wipe pads clean with alcohol wipes to remove tire residue
- Check screw tightness using the “finger-test”—if you can turn it with thumb pressure, tighten
- Inspect cables for fraying or rust (replace if strands break)
- Test brakes every time you fold/unfold the chair
Schedule Monthly Deep Checks
- Remove wheels to access hidden contact points
- Clean mounting surfaces with degreaser to prevent slippage
- Apply silicone lubricant to pivot points (never on tire contact areas)
- Measure pad thickness—replace when under 3mm (1/8 inch)
Recognize When Professional Help Is Non-Negotiable
Emergency Red Flags
- Cracks in frame near brake mounts (immediate discontinuation of use)
- Asymmetrical braking where one wheel locks but the other slips
- Metal-on-metal grinding indicating catastrophic wear
- Brake pads touching wheel rims (causes rapid tire destruction)
Find Qualified Service Fast
Contact your wheelchair manufacturer’s service center using your model number. Local mobility equipment dealers employ certified technicians who typically charge 30% less than hospital services. For urgent needs, university disability programs often provide low-cost maintenance clinics—call their occupational therapy departments directly.
Essential Tool Kit for Brake Adjustments
Must-Have Basics
- Phillips #2 screwdriver (most common brake screw size)
- 3-6mm hex key set (for lever pivot points)
- 8-inch adjustable wrench (for mounting nuts)
- Needle-nose pliers (cable tension adjustments)
Smart Additions
- Silicone lubricant spray (prevents rust without attracting debris)
- Business card (for precise 1mm spacing checks)
- Torx T10 driver (common on newer pediatric models)
- Brake pad replacement kit specific to your wheelchair
Know When Replacement Beats Adjustment
Replace Components Immediately If
- Pads show visible metal backing through the rubber
- Mounting holes are stripped (screws won’t stay tight)
- Levers crack or bend during normal operation
- Tire contact surfaces are unevenly worn
Execute Safe Pad Replacement
- Order exact replacements using your wheelchair’s model number
- Remove old pads by unscrewing retaining bolts
- Clean mounting surface with isopropyl alcohol
- Install new pads with original hardware
- Adjust tension following standard procedures
| Brake Issue | Quick Diagnosis | Immediate Action |
|---|---|---|
| Rolls when locked | Pad too far from tire | Tighten adjustment screws 1/4 turn |
| Sticks when released | Excessive pad pressure | Loosen screws; check for debris |
| One-sided weakness | Uneven adjustment | Balance both sides to equal tension |
| Squealing noise | Contaminated pads | Clean pads and tires with alcohol |
Properly adjusted wheelchair brakes transform precarious transfers into confident movements—your safety depends on this critical system functioning perfectly. Always retest adjustments after every use for the first 24 hours, as components settle during initial operation. When adjustments feel beyond your comfort level, professional service costs less than emergency medical care from a transfer accident. Remember: well-maintained brakes pay daily dividends in independence, but compromised systems create immediate danger. Bookmark your manufacturer’s manual online for model-specific guidance, and perform the 30-second safety check before every transfer—it takes less time than lacing shoes but protects everything that matters.