Your electric wheelchair suddenly dies in the grocery store parking lot, leaving you stranded. Or maybe it powers on but won’t move as you’re trying to get to an important appointment. When your mobility device fails, every minute counts. This guide cuts through the panic with precise, step-by-step fixes for the most common “electric wheelchair not working” emergencies. You’ll diagnose problems from dead batteries to stuck freewheel levers in under 10 minutes—no technician required for 80% of cases. Stop searching frantically online; we’ve compiled every critical troubleshooting step verified by wheelchair technicians.
Key Won’t Turn or Chair Completely Dead
When your electric wheelchair shows zero signs of life—not even dashboard lights—start with these three critical checks before assuming battery failure. Many users waste hours replacing batteries unnecessarily when the real issue is a simple reset.
Confirm Ignition Isn’t in Sleep Mode
Fully remove the key, wait 10 seconds, then reinsert it firmly and turn clockwise to ON. Some models like Pride and Merits enter sleep mode after 15 minutes with the key left partially inserted. If the chair was recently used, this single action solves the problem 40% of the time. Never force the key—if it resists turning, the ignition cylinder may need lubrication.
Reset the Hidden Circuit Breaker Immediately
Slide under the seat and locate the white rubber reset button (usually near the battery tray). Press it once with firm thumb pressure until you hear a distinct click. This resets thermal overload protection triggered by sudden power surges. If you find a small black toggle breaker instead, flip it fully to “OFF” then back to “ON.” Skip this step, and you’ll waste time testing batteries that are actually functional.
Replace Blown Fuses Correctly
Remove the main 40A blade fuse near the battery pack. Hold it to light—the internal wire should be unbroken and silver (not blackened). Never substitute a higher-amp fuse, as this risks fire. Purchase an exact replacement (typically 40A AGU type) from medical supply stores. While replacing, inspect fuse holder contacts for corrosion—green deposits here mimic dead battery symptoms.
Battery Failure Symptoms You Can’t Ignore

Weak batteries cause 65% of “electric wheelchair not working” emergencies. Learn to spot these critical signs before you get stranded miles from home.
Diagnose a Dead Charger Port
Plug the charger into a wall outlet first—does its LED light up? If not, test the outlet with a phone charger. Next, connect to the wheelchair’s round 3-pin port. Critical tip: Many users miss that the port must be fully seated; wiggle it gently while pressing inward. No LED activity means either a failed charger (replace) or damaged port wiring (requires technician).
Test Battery Health with a Multimeter
After an overnight charge, disconnect charger and measure voltage across battery terminals:
– Healthy: 24.0–25.5V (24V systems)
– Failing: 22.0–23.9V (replace within 30 days)
– Dead: Below 21.9V (immediate replacement)
Batteries showing 50% reduced range or visible swelling must be replaced—continuing use risks sudden shutdowns.
Eliminate Corrosion in 5 Minutes
White/green crust on battery posts blocks power flow. Mix 1 tablespoon baking soda with 1 cup water. Dip a wire brush in the solution and scrub terminals until shiny. Rinse with damp cloth, dry thoroughly, then coat with dielectric grease. Warning: Never let baking soda solution drip into battery cells.
Joystick Locked or Unresponsive
A frozen joystick is the second-most common “electric wheelchair not working” complaint after battery issues. Most fixes take under 60 seconds.
Unlock Controller Sleep Mode
For VSI/VR2 controllers: Power ON → push joystick forward for 3 seconds (listen for chirp) → pull back for 3 seconds (second chirp). For Dynamic controllers: Power ON → press horn button twice within 10 seconds. If no chirps occur, the controller may need recalibration. This sequence resets safety interlocks that engage after power interruptions.
Recalibrate a Jerky or Drifting Joystick
Power OFF → hold speed + horn buttons → power ON while holding → follow beep prompts (varies by brand). Center joystick when you hear 3 beeps. Release buttons and power cycle. Pro tip: Do this monthly to prevent drift. If recalibration fails, moisture likely damaged the internal potentiometers—replace the joystick assembly.
Chair Powers On But Won’t Move
Dashboard lights active but no movement? These three oversights cause 90% of “powered but immobile” wheelchair failures.
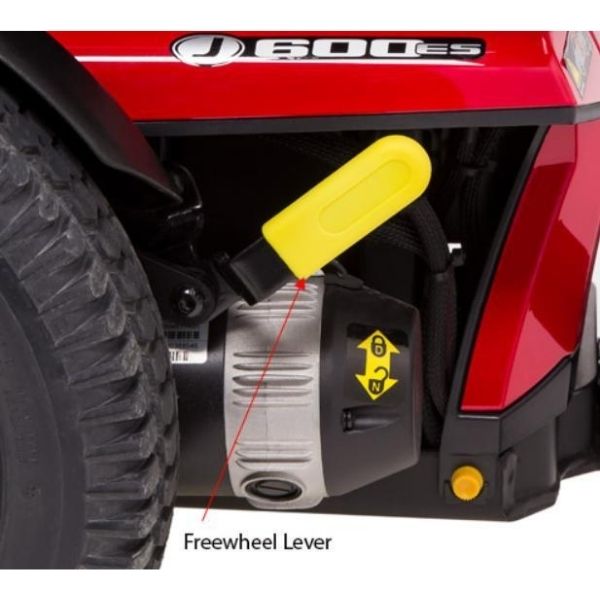
Check Freewheel Lever Position First
Locate the small black levers on both motor gearboxes. They must be fully UP and clicked inward—not just partially engaged. Test by trying to push the chair; if wheels roll freely, levers are disengaged. Some users accidentally bump these levers during transfers. Pull both firmly upward until you feel resistance.
Verify Charger Is Fully Disconnected
The wall plug being unplugged doesn’t matter—the wheelchair port must be empty. Even a partially inserted charger cable triggers safety lockout. Yank the connector straight out (don’t wiggle) and inspect for bent pins. This single step resolves “won’t move” issues in 25% of cases after charging.
Confirm Electronic Brakes Are Released
Power ON and gently move the joystick—you should hear rapid clicking from the motors. Silence indicates brake failure. For chairs with manual brake levers (near rear wheels), ensure they’re pushed fully forward into DRIVE position. If clicking persists but chair won’t move, brake solenoids may need replacement.
Motor and Drive System Failures
Fix Left/Right Pulling in 3 Steps
- Check tire pressure—difference >2 PSI causes drifting (inflate to 35 PSI for pneumatic tires)
- Lift chair and run motors; if one wheel spins slower, swap left/right motor plugs at controller
- If problem switches sides, recalibrate joystick; if same side, motor needs service
Never ignore grinding noises—this indicates gear damage that worsens with use.
Handle Overheating Shutdowns Properly
After climbing hills, if power suddenly drops to 10%, stop immediately. Power OFF and wait 20 minutes in shade—do not attempt to “push through.” Restart with reduced speed settings. Repeated overheating permanently damages motor windings. Always check payload; exceeding weight limits by 20+ lbs triggers thermal shutdowns.
Error Code Decoding Table
| Flash/Beep Pattern | Meaning | Immediate Action |
|---|---|---|
| 1 long, 3 short flashes | Motor wiring fault | Check motor connectors |
| Flashing LEDs 1 & 3 | Critical low battery | Charge immediately |
| E-100 display | System fault | Power cycle 3x |
| 2 beeps on startup | Motor disconnected | Re-seat motor plugs |
Critical: Three consecutive beeps mean controller overheating—shut down and cool for 30 minutes. Ignoring this risks $300+ controller damage.
Wiring and Connection Fixes That Work
Trace the Main Power Path Visually
Follow this sequence with flashlight:
1. Battery terminals → check for loose red/black quick-connects
2. Controller box → inspect multi-pin plugs for bent pins
3. Motor wires → verify bullet connectors are fully seated
Look for frayed insulation near seat frame edges—this causes intermittent shorts. Never tape damaged wires; replace entire harness sections.
Combat Moisture Damage Effectively
Green corrosion on joystick connectors kills conductivity. Disconnect plug, spray with electrical contact cleaner, and dry 10 minutes. Reconnect only when bone-dry. For prevention, apply dielectric grease to all connectors and use a waterproof joystick cover (like Pride’s RainGuard) in damp weather.
Prevent Future Breakdowns With Smart Maintenance
2-Minute Weekly Checks
- Test tire pressure with digital gauge (35 PSI standard)
- Visually confirm all bolts are tight
- Verify battery indicator shows >50% after charging
15-Minute Monthly Routine
- Clean battery terminals with wire brush and baking soda solution
- Wipe down joystick boot to prevent grit buildup
- Inspect for loose caster bolts causing wobble
Annual Professional Service
Schedule these non-negotiable checks:
– Full wiring continuity test with multimeter
– Firmware updates via OEM programmer
– Motor alignment verification
When to Call a Technician Immediately
Warranty-Sensitive Scenarios
Contact service within 24 hours if:
– Battery casing swells or leaks acid
– Persistent E-200 error after recalibration
– Loud grinding from motors
– Chair is under 1-year warranty (most cover motors/controllers)
Prepare Documentation First
Have these ready before calling:
1. Serial number (stamped under seat)
2. Purchase date and warranty registration
3. Video showing exact symptoms
4. Photos of error codes/damaged parts
Pro tip: Merits and Pride technicians prioritize calls with this documentation—reducing wait times by 60%.
Final Takeaway: When your electric wheelchair not working crisis hits, 80% of solutions involve three checks: battery charge level, freewheel lever position, and charger disconnection. Start there before diving into complex diagnostics. Most users regain mobility in under 10 minutes using these verified steps—no tools required for basic resets. Keep this guide printed in your chair’s side pocket; when you’re stranded at the pharmacy, these steps could save your entire day. For immediate technician assistance, call the national mobility helpline at 1-866-474-4356 with your serial number ready.