
Your wheelchair isn’t just transportation—it’s part of your wedding story. Whether you’re the bride gliding down the aisle or a parent celebrating their child’s big day, these decoration techniques prove beauty and function coexist. Forget flimsy ribbons that snag or heavy arrangements that impede movement. This guide delivers photographer-approved methods that keep you rolling freely while turning heads. You’ll learn exactly how to match florals to your bouquet, secure lights for golden-hour photos, and pass every safety check—all without risking a single transfer or brake function.
Match Your Chair to the Wedding Palette Like a Pro
Extract Exact Colors From Bridal Attire
Grab fabric swatches from bridesmaid dresses or table linens before buying ribbons. Pantone color mismatches ruin photos—ivory satin that looks perfect online often photographs yellow against your gown. Pro tip: Tape swatches to your wheelchair seat and photograph them in natural light. If the shade clashes, return before assembly day.
Shrink Themes to Chair-Scale Proportions
Rustic weddings? Wrap push handles in miniature burlap bows, not full table runners. Gothic lace becomes delicate strips along the chair back, not floor-length drapes. Winter themes shine with battery-powered snowflake projectors aimed at the floor beneath your chair—never obstructing wheels. This creates magic in photos while keeping every function accessible.
Layer Textures Without Bulk
Pair smooth satin ribbons with rough eucalyptus leaves for depth in photos. Matte velvet against metallic spoke covers adds luxury without weight. Avoid thick foam arrangements—they catch on doorframes and add dangerous top-heaviness. Stick to lightweight dried bunny tail grass or silk peonies that won’t wilt during vows.
Essential Wedding Wheelchair Materials Checklist
Structure Foundation
– Non-adhesive rubber shelf liner (prevents sliding without residue)
– Microfiber cable ties (stronger than zip ties, gentler on paint)
– Florist stem tape (invisible under ribbon wraps)
Floral Selection
– Live flowers: Order 10% extra seeded eucalyptus and lisianthus (they last 8+ hours with hydration)
– Silk backup: High-quality peonies matching your bouquet (stash in dust-free box for emergencies)
– Dried accents: Bunny tail grass adds texture with zero wilting risk
Lighting Solutions
– USB-rechargeable bicycle spoke lights (6-hour battery life, warm white for photos)
– Micro fairy lights with hidden seat-cushion battery packs
– Magnetic LED pucks for under-seat glow (no wiring visible)
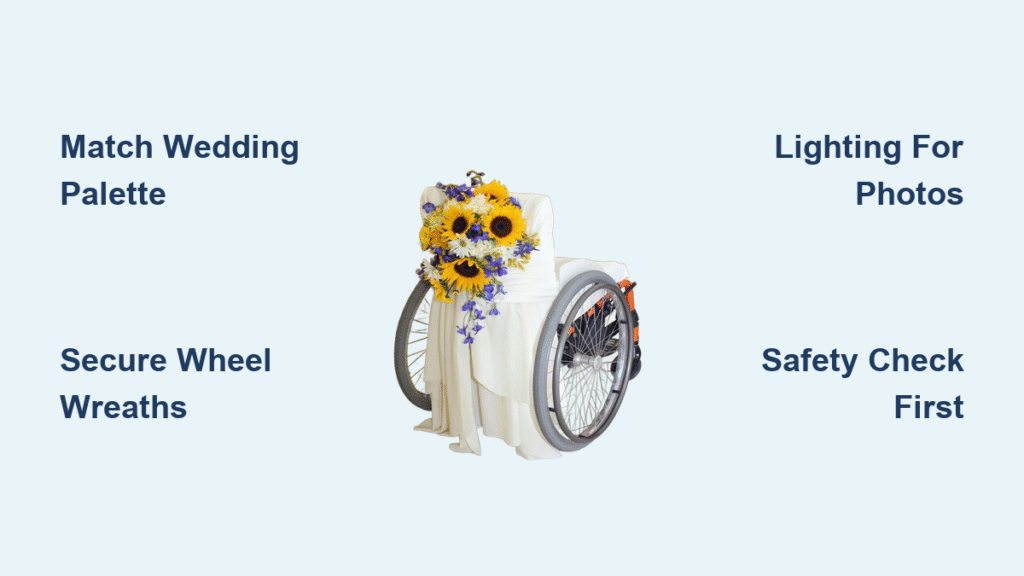
Secure Wheel Wreaths That Spin Safely
Measure Precisely Before Building
Record your exact wheel diameter—most chairs use 22″ or 24″ wheels. Build grapevine wreaths 1 inch smaller than your measurement. A 23″ wreath on a 24″ wheel prevents doorframe catching during the aisle walk.
Attachment Method That Survives Spinning
- Thread microfiber cable ties through wreath base at 4 equal points
- Attach only to spokes (never brake rims or tire tread)
- Snip excess tie length and lightly melt ends with a lighter
- Critical test: Spin wheel rapidly—wreath must stay flush against spokes with zero wobble
Floral Placement Rules for Zero Snags
Position blooms facing inward toward the chair back. Outward-facing flowers catch on doorframes and guests’ dresses. Start with Italian ruscus as your base layer, then add focal flowers like roses in odd numbers (3 or 5 blooms). Never exceed 3 pounds total weight—extra ounces pull chairs backward on ramps.
Back Handle Bouquet: Frame Your Shoulders Safely
Hydration System That Actually Works
Create tiny water chambers using travel-sized shampoo bottles lined with wet paper towels. Insert stems, seal openings with florist tape, and conceal mechanics with ribbon wraps. Critical: Test for drips 24 hours pre-wedding—water damage on silk gowns is irreversible.
Attachment Technique for Comfortable Pushing
- Place rubber grip liner on horizontal push handle
- Secure with two microfiber ties oriented vertically (won’t interfere with hands)
- Angle bouquet 45° outward to frame your shoulders beautifully
- Keep total weight under 1 pound—heavy arrangements strain arms during photos
Lighting That Photographs Perfectly

Spoke Light Setup for Golden Hour
Clip LED rings to the inner wheel hub, routing wires along spoke undersides. Hide battery packs under seat cushions in zippered pouches. Essential: Practice turning lights on/off while seated—awkward reaching ruins candid moments. Schedule wheelchair portraits during golden hour (one hour before sunset) for maximum visual impact.
Fairy Light Magic Without Tangles
Wrap 3-meter warm-white strands loosely around push-rims. Secure every 6 inches with clear tape (never glue). Battery packs tuck discreetly under seat edges for quick access during toasts. Avoid multicolor lights—they clash with wedding palettes in photos.
Role-Specific Decoration Plans

Bride’s Chair Floral Crown
Attach a lightweight floral crown to the headrest using adjustable Velcro straps—removes instantly for transport between venues. Integrate lace appliqués from your dress train onto chair back upholstery for seamless flow. Critical: Add detachable 3-foot chiffon ribbon streamers to push handles for the aisle walk, but remove them immediately after vows to prevent tangling during the first dance.
Flower Girl Wheelchair Charm
Use Command Mini Hooks on side frames to hang miniature floral baskets. Scale blooms to avoid obstructing the child’s view—spray roses and wax flower only. Apply removable vinyl daisy stickers on side guards for whimsy without residue. Never attach anything to footrests—they interfere with propulsion.
Parent/Grandparent Elegance
Hang linen banners reading “Mother of the Bride” across chair backs using magnetic clips (position high enough to avoid shoulder interference). Attach mini framed photos of loved ones to armrests via ribbon lanyards—use non-glare glass to prevent flash reflections. Skip heavy floral arrangements; opt for single silk roses on push handles.
30-Day Wedding Preparation Timeline
30 Days Out: Source exact ribbon swatches. Measure chair dimensions including doorway clearance (minimum 32″ required). Test lighting battery life.
14 Days Out: Order silk duplicates of live florals. Purchase zip ties and shelf liner in bulk—always have extras for last-minute fixes.
7 Days Out: Pre-assemble hydration chambers. Pre-wrap spoke covers if using metallic finishes.
2 Days Out: Create back-handle bouquets. Store live flowers upright in the fridge; silk arrangements in dust-free boxes.
Wedding Eve: Attach non-floral elements (ribbons, lights). Charge all batteries overnight.
Day Of: Install live florals 2 hours before ceremony. Perform final safety check with user performing full range of motion.
Emergency Removal Kit Essentials
Pack these with your wedding coordinator:
– Wire cutters for stubborn zip ties
– Citrus-based adhesive remover (safe for upholstery)
– Spare zip ties and clear tape
– Small scissors for ribbon emergencies
– Extra batteries for lighting failures
Non-Negotiable Safety Checklist (Perform 24 Hours Pre-Wedding)
☐ Transfer Test: Can you move independently without snagging decorations?
☐ Brake Access: Confirm all brake levers remain fully functional
☐ Charging Ports: Verify battery access stays unobstructed
☐ Doorway Clearance: Test widest decorated point through standard doors
☐ Ramp Navigation: Ensure floral weight under 3 pounds total
☐ Emergency Removal: Confirm all attachments come off in under 2 minutes
Post-Wedding Care That Preserves Memories
Live flowers: Mist lightly with water (avoiding upholstery), compost or dry blooms within 48 hours.
Silk arrangements: Store in labeled containers for anniversary photos.
Fabric cleaning: Hand-wash ribbons in gentle detergent, air-dry flat.
Wheel inspection: Post-event, test all wheels and brakes for wear caused by decorations.
Your decorated wheelchair tells a story of inclusion and joy—where mobility needs meet wedding magic. By prioritizing function first, you create stunning visuals that enhance rather than hinder your celebration. Remember: the most beautiful detail is your unobstructed smile as you roll confidently down the aisle, fully present in the moment that matters most.


