

Your wheelchair brakes keep you safe during transfers and daily activities. When they’re worn, loose, or completely broken, replacing them isn’t just about convenience—it’s about maintaining your independence. Whether you’re dealing with squeaky push locks or upgrading to scissor brakes, knowing how to put brakes on a wheelchair correctly ensures reliable stopping power when you need it most.
Most wheelchair users can complete brake replacement in under an hour with basic tools. The key is understanding your brake type and following the correct sequence. Let’s get your wheels locked down properly with this step-by-step guide that covers everything from identifying your system to final safety testing.
Identify Your Brake Type Before Installation
Push/Pull Lock Systems
Push-to-lock brakes dominate manual wheelchairs, especially pediatric models. You’ll recognize them by the lever you push down to engage. These systems use a simple bar that presses against your tire. Pull-to-lock variations give extra leverage using your body weight—perfect if you have limited hand strength. Check your wheelchair frame near the rear wheels for these common mounting points.
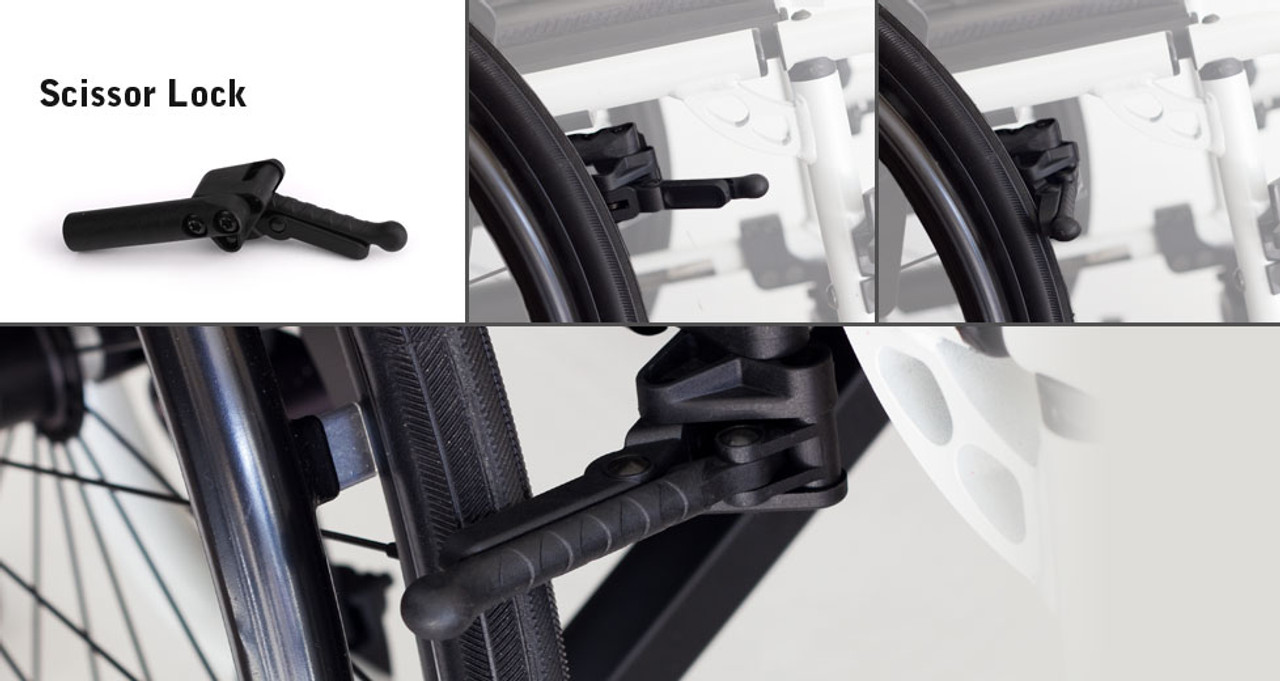
Scissor Lock Mechanisms
Frame-mounted scissor locks sit clear of your tires when disengaged, protecting your fingers during active use. These work best for experienced wheelchair users who rely on push rims. The locking bar folds away completely, but requires precise finger control to operate. Look for X-shaped metal components that fold vertically along your wheelchair frame.
Hub-Based Wheel Locks
Hub locks connect directly to your wheel’s center, avoiding tire contact entirely. These concealed systems often include extension levers for users with limited reach. If your brakes engage at the wheel center rather than the tire, you’re working with hub locks. These are common on newer manual wheelchairs and require specific alignment during installation.
Gather Essential Tools Before Starting
Verify Compatibility First
Check your wheelchair manual for brake specifications—don’t guess. Measure the distance from your frame to tire where the brake mounts. Most manufacturers list compatible brake types by wheelchair model. When in doubt, contact your wheelchair supplier with your serial number before purchasing replacement brakes.
Essential Tool Checklist
- New brake assembly matching your wheelchair specifications
- Screwdriver set (check your wheelchair’s bolt type first)
- Adjustable wrench for mounting bolts
- Work gloves and safety goggles
- Wheel chocks or heavy books for stabilization
Remove Old Brake Assembly Safely
Secure the Wheelchair Completely
Lock your existing brakes or wedge wheel chocks firmly against both rear tires. Push down on the wheelchair seat to ensure it won’t shift. Never work on a wheelchair that can roll unexpectedly—this is your first critical safety step when learning how to put brakes on a wheelchair.
Locate and Remove Mounting Hardware
Find all bolts connecting your brake to the frame—typically 2-4 mounting points. Use your screwdriver to loosen bolts counterclockwise. Keep one hand supporting the brake assembly as you remove the final bolt to prevent it from dropping. Note the order of washers and spacers for reinstallation.
Slide Off Old Components Carefully
Carefully pull the brake assembly away from the frame. Pay attention to how spacers or washers are positioned—you’ll reinstall them the same way. Set aside reusable hardware like bolts and spacers in a small container so nothing gets lost during the process of putting new brakes on your wheelchair.
Position New Brake Assembly Correctly
Mounting Point Identification
Hold your new brake assembly against the frame where the old one was removed. The brake pad should align with your tire’s center or edge, depending on brake type. Double-check that the lever faces the direction you can reach comfortably from your seated position—this is crucial for daily usability.
Initial Positioning Checks
Position the brake so the locking mechanism clears your tire by 1-2mm when disengaged. When engaged, the brake pad should make firm contact across the tire’s surface—not just the edge. Test the lever’s reach from your typical sitting position before tightening anything.
Verify Clearance and Alignment
Spin your wheel slowly by hand. The brake assembly shouldn’t rub or catch on spokes, tire tread, or wheel rim. Adjust positioning slightly if you hear any scraping. Proper clearance prevents premature wear and ensures smooth operation after you finish putting brakes on your wheelchair.
Mount and Secure New Brakes Properly
Hand-Tighten First for Adjustments
Insert mounting bolts through your new brake assembly into the frame holes. Turn bolts clockwise by hand until snug—don’t fully tighten yet. This allows final adjustments before permanent installation. Rushing this step is one of the most common mistakes when attempting how to put brakes on a wheelchair.
Check Final Positioning Before Tightening
Test brake engagement one more time before tightening completely. The brake should lock firmly without requiring excessive force. If positioning looks good, proceed to full tightening. This verification step ensures you won’t need to repeat the entire process later.
Complete Installation with Proper Torque
Using your screwdriver or wrench, tighten mounting bolts firmly but don’t over-torque. Wheelchair frames can crack under excessive pressure. Tighten bolts in a crisscross pattern if multiple mounting points exist. The brake assembly shouldn’t wiggle when you test it after completing how to put brakes on a wheelchair.
Adjust Brake Tension for Optimal Performance
Test Initial Engagement Thoroughly
Engage your new brakes fully and attempt to roll the wheelchair. The wheels should lock completely without any forward or backward movement. If the chair moves even slightly, your brakes need tightening. This test is non-negotiable for safety after putting new brakes on your wheelchair.
Fine-Tune Brake Tension Methodically
Most brake assemblies include adjustment screws or knobs near the mounting point. Turn clockwise to increase tension (brake grips tighter) or counterclockwise to reduce tension. Make small adjustments—1/8 turn at a time—then retest. Patience here prevents over-adjustment.
Verify Smooth Operation Daily
The brake lever should engage and release smoothly without sticking. If operation feels stiff, check for proper lubrication at pivot points. Never use household oils—consult your manual for recommended lubricants. Smooth operation is essential for reliable function after putting brakes on your wheelchair.
Complete Safety Testing Before Use
Basic Function Test Protocol
Engage brakes on level flooring and push against the wheelchair from different angles. The chair shouldn’t budge. Test brake release—levers should return to their original position without assistance. Never skip this critical step after learning how to put brakes on a wheelchair.
Surface and Angle Testing Requirements
Test your new brakes on various surfaces: smooth tile, carpet, and outdoor concrete. Try gentle inclines if available. Brakes should hold reliably regardless of surface texture or slight slopes. Real-world testing reveals issues that flat-surface tests might miss.
Weight-Bearing Transfer Simulation
Simulate a transfer by placing weight on one wheel while brakes are engaged. The wheelchair should remain completely stationary. If any wheel slips during this test, return to tension adjustment immediately. This mimics the most dangerous real-world scenario.
Troubleshoot Common Problems Quickly
Brake Slippage Solutions
If brakes slip despite proper tension, inspect your tires for excessive wear or damage. Smooth, bald tires reduce brake effectiveness. Check brake pad wear—replace pads when grooves become shallow or surfaces appear glazed. Slippage is unacceptable after putting brakes on your wheelchair.
Difficult Engagement Fixes
Brakes that are hard to engage usually need loosening. Turn adjustment screws counterclockwise in small increments. If adjustment doesn’t help, verify you’re using the correct brake type for your wheelchair model. Never force engagement beyond comfortable reach.
Inconsistent Performance Diagnosis
Uneven brake performance often indicates frame misalignment. Check if your wheelchair frame is bent or twisted. Look for loose bolts not just on brakes, but throughout the rear wheel assembly. Consistent performance is non-negotiable for safety.
When to Call Professionals for Brake Installation
Complex System Installation Needs
Hub locks or power-assist brake systems require specialized tools and expertise. These installations are best left to certified technicians who understand electronic components and hydraulic systems. Don’t risk safety with systems beyond your skill level.
Frame Modification Warning Signs
If new brakes don’t align with existing mounting points, frame drilling or welding may be necessary. Never attempt frame modifications yourself—this can void warranties and create serious safety hazards. When in doubt, consult a professional.
Warranty Preservation Strategy
Professional installation often preserves your wheelchair warranty. Check your warranty terms before self-installing. Many manufacturers require authorized service for brake system replacements to maintain coverage—this could save hundreds in future repairs.
Final Safety Reminders Before Use
Daily Pre-Use Verification Ritual
Before each use, engage your brakes and test them gently. This 30-second habit prevents dangerous situations during transfers. If brakes feel different than yesterday, stop and inspect immediately. Consistent checking saves lives after putting brakes on your wheelchair.
Never Compromise on Safety Standards
Replace worn brake components immediately—don’t wait for complete failure. If you’re unsure about any installation step, seek professional help rather than risking incorrect installation. Your mobility and safety depend on properly functioning brakes.
Your wheelchair brakes are your foundation for safe, independent mobility. With proper installation and regular maintenance, quality brake systems provide years of reliable service. Take time to install them correctly—your safety depends on it. Remember that knowing how to put brakes on a wheelchair isn’t just about the installation process, but understanding the critical role these components play in your daily safety and independence. When in doubt, always consult a professional wheelchair technician who can verify your work meets safety standards.


