
Struggling to move from your wheelchair to the toilet? You’re not alone—over 3.6 million Americans rely on transfer boards for daily bathroom independence. A transfer board creates a smooth sliding pathway between your wheelchair and toilet, eliminating risky lifts that strain your back or cause falls. Instead of one exhausting leap, you’ll use controlled micro-movements to glide across safely. Whether you’re recovering from surgery or managing long-term mobility challenges, mastering this technique restores privacy and confidence. By the end of this guide, you’ll know exactly how to position equipment, execute transfers without injury, and troubleshoot common pitfalls—all while keeping your caregiver safe too.
Essential Equipment Checklist

Required Transfer Tools
Grab these four non-negotiable items before starting: a smooth wooden or plastic transfer board (8-10 inches wide), a sturdy transfer belt that fits snugly around your waist, a wheelchair with lockable wheels and removable footrests, and a standard-height toilet with clear access on all sides. Never substitute household items like cutting boards or plywood—these lack the reinforced edges needed to support your weight and can splinter during use. Check that your transfer board shows no cracks or warping; even hairline fractures compromise safety. If your wheelchair wobbles when locked, get the brakes serviced immediately—unstable equipment causes 68% of transfer accidents according to rehabilitation specialists.
Pre-Transfer Room Setup
Clear a 3-foot radius around the toilet to eliminate tripping hazards like rugs or medical equipment. Position your wheelchair parallel to the toilet with the seat surfaces aligned at the same height—ideally leaving only a 2-3 inch gap. Lock both wheels by slamming the brake levers downward until they click audibly, then test stability by shaking the chair. Remove the footrest on the toilet side completely (not just swung away) and detach the adjacent armrest. Place your transfer board within arm’s reach on the wheelchair seat, and wipe the toilet surface dry to prevent slipping. If a caregiver assists you, rehearse the sequence silently: “3-2-1, shift” prevents rushed movements that lead to falls.
Position Wheelchair and Board
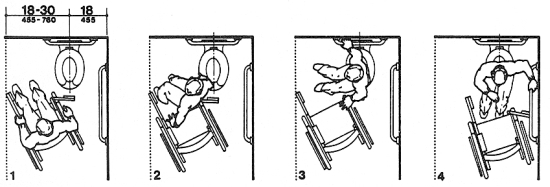
Optimal Wheelchair Placement
Slide your wheelchair sideways until the seat edge nearly touches the toilet—your knuckles should barely clear the porcelain when reaching forward. This minimizes the gap your transfer board must bridge. Confirm both wheels are locked by trying to roll the chair backward; if it moves even slightly, readjust the brakes. Remove the footrest closest to the toilet entirely to create unobstructed leg space. If your chair has removable armrests, take off the one facing the toilet—this reduces catching points during sliding. Critical check: Ensure your wheelchair won’t roll forward when you push up; test by leaning against the backrest while brakes are engaged.
Transfer Board Angle and Placement
Hold the board at a 10-15 degree downward angle toward the toilet, pointing the far end toward the back corner of the seat. Slide the wheelchair end firmly beneath your thigh, extending it 6+ inches under your leg for stability. The board should rest flat against the toilet seat’s rear edge—not the front where it could tip. Position the front edge just ahead of the wheelchair’s rear wheel to prevent backward shifting. Test stability by pressing your palm on the board’s center; if it wobbles, reposition it with 1 inch less under your thigh. Pro tip: Lean your upper body away from the toilet while inserting the board—it creates space for smoother placement without pinching skin.
Execute Safe Transfer Movement
Starting Position and Body Mechanics
Perch on the wheelchair’s forward edge with feet flat on the floor, shoulder-width apart. Fasten your transfer belt snugly above your hip bones—it’s your lifeline if balance falters. Place hands palms-down on the wheelchair seat beside your hips, fingers pointing toward your feet. Push down firmly to lift your hips 1-2 inches off the seat, reducing friction for sliding. If one side is weaker (e.g., right leg after stroke), lean slightly left to shift weight off the compromised side. Never grip the board—your hands must stay free to stabilize during movement.
Controlled Sliding Technique
Use three deliberate micro-movements instead of one risky slide: 1) Push up with arms while leaning shoulders right, shifting hips 2 inches left toward the toilet. 2) Lower gently onto the board, reposition hands, then lean shoulders left as you slide another 2 inches. 3) Repeat until fully on the toilet. Each shift should take 3-5 seconds—rushing causes 80% of transfer falls. Keep your chin tucked and eyes forward to maintain spinal alignment. If a caregiver assists, they’ll anchor the transfer belt at your waist and count “1-2-3, move” before each shift. Key insight: Your upper body counterbalance (leaning opposite your hip movement) makes sliding effortless—it’s physics, not strength.
Final Positioning and Board Removal
Completing the Transfer
Pause for 10 seconds once centered on the toilet to ensure stability before removing the board. Lift the board straight upward—never pull sideways—to avoid skin abrasions. If helping someone else, hold the board steady while they adjust clothing, then step out of the bathroom but stay within earshot. For individuals who can’t manage clothing mid-transfer, remove undergarments before starting while seated in the wheelchair—this requires a caregiver’s assistance for modesty but prevents dangerous twisting on the toilet.
Clothing Management Considerations
Wait until fully seated on the toilet before handling clothing whenever possible. Struggling with pants during transfers is a top cause of falls. If you must remove clothing earlier (e.g., with limited hand function), have your caregiver secure a privacy drape around your waist before the transfer begins. Button-front pants or elastic waistbands simplify this process—avoid zippers or complex fasteners during early recovery phases.
Reverse Transfer: Toilet to Wheelchair

Preparing for Return Journey
Before standing, ensure your wheelchair remains locked in its original position with footrests still removed. Reapply undergarments while seated—this prevents exposure during the transfer back. Place the transfer board from toilet to wheelchair at a slight upward angle (opposite of the initial placement) to facilitate sliding toward the chair. Verify both board ends sit flush; if the toilet seat is slippery, place a dry washcloth under the board’s edge for grip.
Mirror-Image Process
Execute the return transfer using identical micro-movements: lean shoulders right while sliding hips left toward the wheelchair. Count each shift aloud if unassisted (“1-2-3, move”) to maintain rhythm. Once fully seated in the wheelchair, pause 5 seconds before removing the board. Only then should you reattach footrests and armrests—attempting this earlier risks tipping the chair. Critical safety step: Test wheelchair brakes again before rolling away; vibration during transfers can sometimes release locks.
Safety Protocols and Common Mistakes
Individual Safety Rules
Never attempt transfers alone until a physical therapist certifies your independence—70% of first-time solo attempts result in injury. If you feel unstable during a slide, freeze and call for help; “pushing through” causes spinal compression injuries. Always wear non-slip shoes during transfers; socks increase fall risk by 40%. Red flag: If your transfer board bends visibly under weight, replace it immediately—wooden boards degrade after 18 months of daily use.
Caregiver Protection Guidelines
Caregivers: Plant your foot against the user’s weaker side (e.g., left foot against their right leg if right side is impaired) for leverage. Bend knees deeply while keeping your back straight—this uses leg muscles instead of spinal discs. Grip the transfer belt at hip level, never under the arms (risks nerve damage). Count down before each movement so both parties shift simultaneously. Pro tip: Wear grippy shoes; 52% of caregiver back injuries occur on slippery bathroom floors.
Troubleshooting Transfer Challenges
Gap and Height Issues
If the gap exceeds 4 inches after optimal positioning, install a raised toilet seat to match wheelchair height—never force the board across wide spaces. For uneven floors, place a non-slip rubber mat under the toilet end of the board. Test stability by pressing down with 20 pounds of force; if the board shifts, add a second mat wedge under the low side.
Board Stability Problems
A sliding board usually means incorrect angling—reposition it with the wheelchair end 1 inch deeper under your thigh. If the board still slips, try a textured-surface model (available in plastic versions). Quick fix: Place a folded towel between the board and toilet seat for instant grip during emergencies, but replace damaged boards within 24 hours.
Long-Term Success and Maintenance
Building Independence
Start with full caregiver assistance for 5-7 transfers to master body mechanics. Progress to “spotting” (caregiver hand-hovering without contact) after 10 successful transfers. Most users achieve full independence within 3 weeks of daily practice. Schedule monthly self-checks: if transfers take longer than 90 seconds or cause fatigue, request a physical therapy reassessment.
Equipment Care Schedule
Wipe your transfer board with soapy water after each use and air-dry vertically to prevent warping. Inspect weekly for splinters (wood) or hairline cracks (plastic)—replace boards showing any damage. Check transfer belt stitching monthly; frayed webbing fails at 300 pounds versus the standard 600-pound rating. Test wheelchair locks biweekly by attempting to roll the chair while seated.
Key Takeaway: Safe wheelchair-to-toilet transfers using a transfer board demand precise positioning, incremental movements, and equipment vigilance—not brute strength. Master these techniques to reclaim bathroom independence while protecting yourself and caregivers from injury. When in doubt, pause and reassess: rushing transfers causes 4 of 5 preventable falls. For personalized guidance, consult a physical therapist certified in mobility transfers—they’ll tailor this process to your specific abilities within one session.


