

That frustrating moment when your wheelchair gets stuck in a doorway isn’t just inconvenient—it’s dangerous. An incorrect width measurement leads to painful pressure sores, exhausting self-propulsion, and lost independence in daily tasks. Most people don’t realize that even a 2-inch discrepancy can compromise safety and mobility. This guide reveals the exact seat width measurement process used by seating specialists, so you can avoid costly mistakes when selecting your wheelchair.
Wheelchair width isn’t about fitting into the chair—it’s about the chair fitting you. Too narrow, and you risk tissue damage from constant hip pressure; too wide, and maneuvering through kitchen counters or bathroom doors becomes impossible. Whether you’re a new user or replacing an old chair, precise width measurement forms the foundation of proper mobility equipment. Skip this step, and you’ll face constant discomfort or premature equipment failure.
Pinpoint Your Exact Body Width While Seated
Find Your True Widest Point with Professional Accuracy
Sit on a firm wooden chair—not a sofa—with your back straight and legs parallel. Have someone measure straight across your hips or thighs at the absolute widest point using a rigid metal tape measure. Crucially, the tape must stay flat and level, not curving around your body. Flexible tapes create false readings by following your contours instead of measuring actual space requirements.
Follow these non-negotiable rules:
– Include all tissue mass—even areas you consider “excess”
– Maintain your natural seated posture (no sucking in)
– Take three separate measurements and use the largest
– Keep the tape parallel to the seat surface throughout
Ignoring these steps risks measurements up to 3 inches too narrow. You’ll know you’ve done it right when the tape sits flush against both hip bones without digging in.
Adjust for Real-World Clothing and Accessories
Modern users rarely need the traditional 2-inch winter clothing allowance. Add only ½ to 1 inch maximum for everyday wear—less if you primarily use your wheelchair indoors. Bulky medical braces or positioning cushions require additional allowances, but standard jeans and t-shirts don’t.
Check these critical factors before finalizing:
– Do you wear hip abduction orthotics that add width?
– Will specialized seating cushions expand your profile?
– Are measurements taken during weight fluctuations?
Overestimating here is as dangerous as underestimating. A wheelchair that’s 4 inches too wide makes self-propulsion exhausting and turns nearly impossible in tight hallways.
Calculate Your Precise Seat Width Using Proven Formulas

Match Your Body to Standard Sizes Correctly
| Seat Width | Ideal User Profile | Required Hip Measurement |
|---|---|---|
| 16″ | Narrow adult | 15-16″ across hips |
| 18″ | Average adult | 17-18″ across hips |
| 20″ | Wide adult | 19-20″ across hips |
| 22″+ | Bariatric user | 21″+ across hips |
Apply this foolproof calculation:
1. Start with your largest seated hip measurement
2. Add ½ inch for clothing (max 1 inch with braces)
3. Round up to the next standard size (16″, 18″, etc.)
4. Verify armrest compatibility before finalizing
Most users stop at step 2, but step 4 prevents 90% of width-related returns. Standard 18″ seats fit average adults, but never assume—you could need a 17″ or 19″ custom size.
Factor in Armrest Design’s Hidden Width Impact
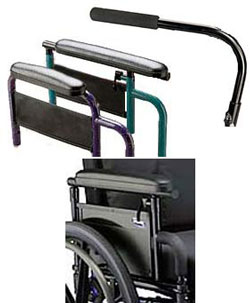
Removable arms mount outside the frame, letting your seat width match your body measurement exactly. Fixed arms often sit above the seat edge, requiring 1-2 extra inches. Desk-length arms (ending at mid-thigh) let you slide close to tables, while full-length arms aid stand-up transfers but add width.
Watch for these width traps:
– Hip guides or abduction bars can add 3+ inches
– Padded armrests take more space than slim models
– Armrest mounting brackets sometimes protrude inward
Measure your chosen chair’s armrests with the same tape you used on your body. If they extend beyond the seat frame, subtract that overhang from your total width allowance.
Ensure Your Wheelchair Fits Your Real Living Environment
Navigate Doorways Without Getting Stuck
Standard wheelchairs measure 28″ overall width—designed for 32″ ADA doorways. But sharp bathroom turns or kitchen countertops change everything. Test your calculated width against your home’s tightest spots: doorframes, hallway corners, and bathroom entrances.
Critical clearance tests:
– Can you make a 90-degree turn in your bathroom? (Requires 36″+ doors)
– Does your lap clear standard 30″ countertops?
– Will ramps accommodate extra width during transfers?
Transport wheelchairs often run 2-4 inches narrower for doorway navigation but sacrifice long-term comfort. Never choose width based solely on doorway clearance—your body’s needs come first.
Balance Width with Propulsion Efficiency
Wider seats make self-propulsion exhausting because your arms can’t reach the handrims comfortably. Narrower chairs navigate tight spaces better but cause hip pressure. For daily use, prioritize body measurements over doorway specs—you can modify doorframes easier than your physiology.
The mobility trade-off checklist:
– ≤18″ seat: Best for narrow homes but requires upper body strength
– 20″+ seat: Easier propulsion but needs wider pathways
– Heavy-duty models: Add 2-4″ to overall width for frame reinforcement
Avoid These Costly Measurement Errors
Never Measure While Standing—It’s Dangerous
Your seated hip width differs significantly from standing measurements due to tissue spreading. Standing measurements miss how your body distributes weight in a seated position, leading to chairs that pinch hips or cause sores.
Stop these dangerous practices immediately:
– Using clothing size as a width reference (jeans sizes ≠ wheelchair sizes)
– Guessing based on previous chairs (models vary by 3+ inches)
– Skipping seated measurements entirely
– Measuring over thick cushions (use hard surfaces only)
One inch too narrow creates 30% more pressure on hip bones—enough to cause sores in under 2 hours.
Don’t Overcompensate “Just to Be Safe”
Adding 3-4 extra inches creates new problems: your hands float off the handrims, making propulsion impossible, and the chair won’t fit through any standard doorway. Overly wide chairs also cause side-to-side sliding during transfers.
Signs your width is excessive:
– You can fit three fingers between hips and frame (two is ideal)
– Wheelchair wobbles during sharp turns
– Armrests prevent close table access
– You slide sideways when braking
Verify Before Finalizing Your Purchase
Test-Fit Like a Professional
Always sit in the exact wheelchair model with your calculated width before buying. Bring your regular clothes and positioning cushions. The two-finger test is critical: you should fit exactly two fingers between your hips and the side frame. More means too wide; less means too narrow.
Must-test scenarios:
– Propelling through your home’s narrowest doorway
– Reaching handrims without shoulder strain
– Transferring from bed to chair with your usual technique
– Fitting under standard kitchen counters
If testing isn’t possible, demand a 30-day trial period with return shipping covered.
Apply the Final Verification Formula
Combine all factors into one definitive calculation:
1. Hip measurement: 17.5″
2. Clothing/brace allowance: +0.75″
3. Armrest adjustment: -0.5″ (removable arms)
4. Total: 17.75″ → Round up to 18″ standard size
Then validate against environment:
– Home doorways: 32″ minimum (✓ passes)
– Bathroom turn radius: 36″ required (✗ fails—needs modification)
– Vehicle transport space: Measure trunk/handicap van
Plan for Your Changing Body and Needs
Anticipate Future Width Adjustments
Your optimal width may change due to weight fluctuations (±1-2 inches), post-surgery swelling, or progressive conditions. Choose chairs with adjustable frames if you anticipate changes. Bariatric users should select models accommodating 22″+ seats before reaching that size.
Annual width reassessment checklist:
– Check for new pressure points on hips/thighs
– Time navigation through tightest home spaces
– Evaluate propulsion effort weekly
– Inspect for frame stress at seat joints
A wheelchair that fit perfectly last year may now cause sores or maneuvering issues. Don’t wait for pain—re-measure every 6 months.
When to Call a Seating Specialist Immediately
Consult a professional if you:
– Need sizes beyond standard 16″-22″ ranges
– Use positioning accessories like hip guides
– Have fixed postural deformities
– Develop frequent pressure sores
– Require bariatric accommodations
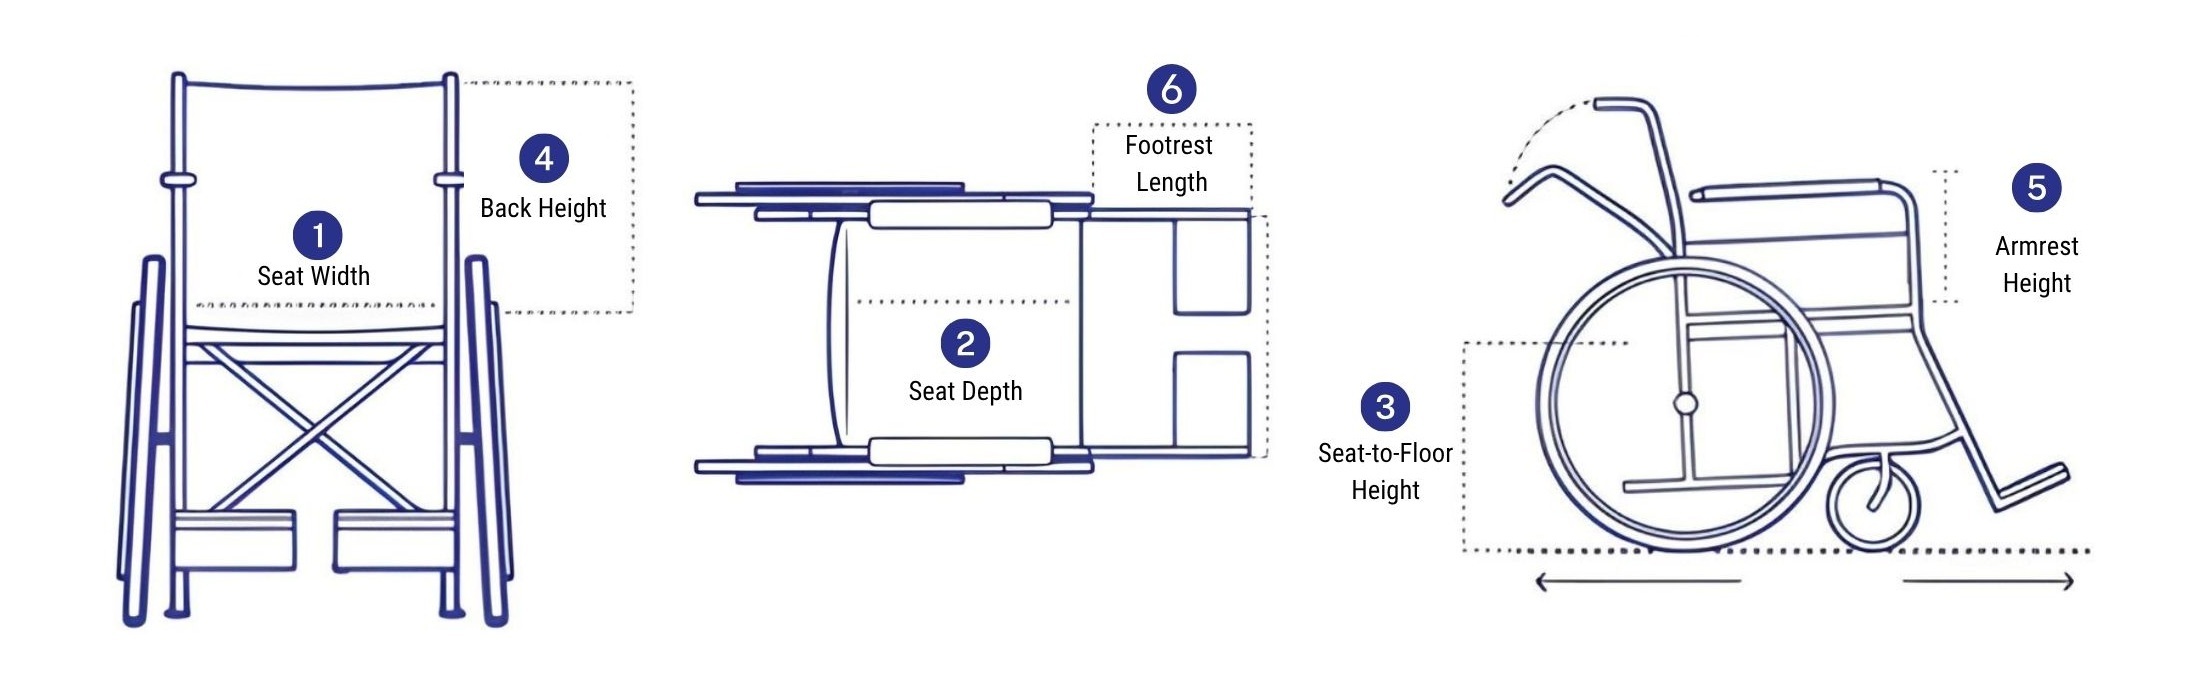
Specialists use the four critical measurements even in time-limited assessments: hip width (C), seat-to-shoulder (G), upper leg length (K), and lower leg length (L). These prevent 83% of width-related complications.
Getting wheelchair width right transforms daily life from a struggle to seamless independence. By following these precise measurement steps, you’ll avoid pain, prevent costly replacements, and move through your world with confidence. Never guess at this critical dimension—your mobility depends on it. When measurements feel overwhelming, seek expert help; it’s far cheaper than replacing an ill-fitting chair. Your perfect-width wheelchair is waiting—measure once, roll comfortably forever.


