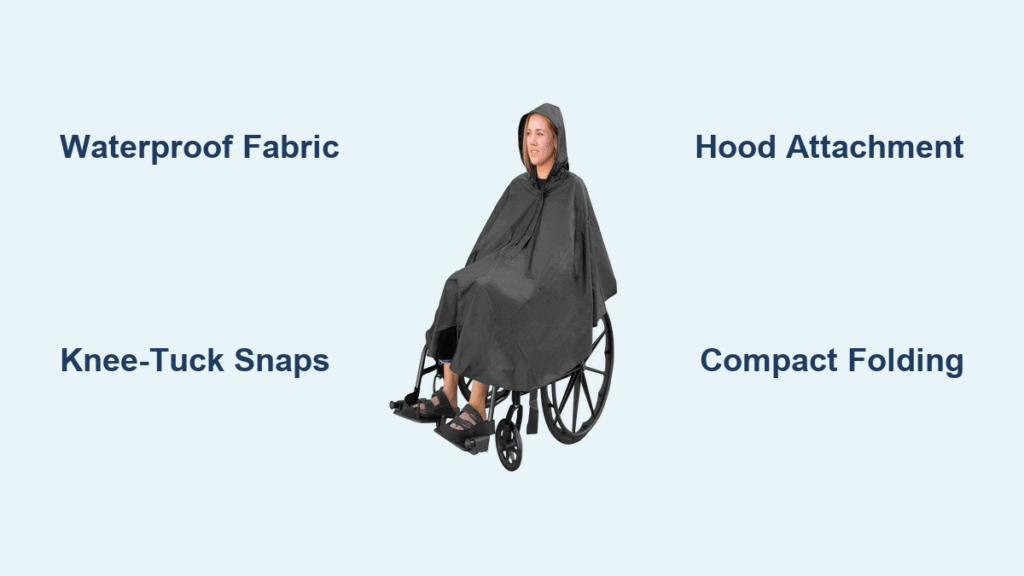
Rainy days shouldn’t mean canceled plans for wheelchair users. Standard rain gear traps moisture where your back meets the seat, leaves wheels and controls exposed, and fights against your natural movements. But a custom wheelchair poncho solves this with one elegant solution: a single garment that shields both you and your chair from head to wheel while folding smaller than your phone. This isn’t just another raincoat—it’s engineered for seated mobility with knee-tuck snaps, wheelchair-clearing hems, and full joystick access. In the next 15 minutes, you’ll learn exactly how to make a waterproof, fleece-lined poncho that stays put through puddles and wind without restricting your independence.
Forget struggling with oversized coats that catch on wheels or leave your lap exposed. A properly constructed wheelchair poncho integrates with your chair’s unique dimensions, covering push handles, footplates, and control panels while allowing effortless movement. What makes this design revolutionary? It addresses three critical failures of ordinary rainwear: the back bunching that creates wet spots, the lack of coverage for wheel mechanisms, and the constant battle to keep sleeves clear of moving parts. By the end of this guide, you’ll have a weatherproof barrier that stows in your side pouch and transforms rainy commutes from miserable to manageable.
Selecting the Right Waterproof Fabrics

Avoid Common Material Mistakes That Cause Leaks
Your outer fabric choice makes or breaks waterproof performance. PU-coated nylon delivers lightweight protection that slides smoothly over clothing during transfers, while oilcloth provides vintage charm with industrial durability. For maximum storm defense, vinyl slicker fabric is unbeatable—but demands special sewing tactics. Before cutting, test your presser foot on scraps: mask sticky vinyl by applying masking tape to the foot’s underside, or switch to a Teflon roller foot. Always buy 58-60″ width fabric and 1⅝ yards total—this ensures full coverage from headrest to wheelbase without seams that invite leaks.
Match Insulation to Your Climate Needs
Your inner layer determines comfort in cold weather. Cotton flannel (2½ yards pre-washed) offers breathable warmth against skin but requires seaming two 1¼-yard pieces selvage-to-selvage for stability. For sub-zero adventures, medium-weight polar fleece (1⅝ yards) provides superior coziness, though its bulk demands ¼” seams or serging to prevent stiff, uncomfortable hems. Never skip prewashing flannel—it prevents post-construction shrinkage that warps your poncho’s fit. Pro tip: If using flannel, top-stitch both sides of the seam for reinforcement; this stops fraying during machine washing.
Precise Cutting for Wheelchair-Specific Fit

Create the Body with Rounded Corners That Won’t Catch on Wheels
Your foundation is a single 45″ × 60″ rectangle cut identically from outer and lining fabrics. The magic happens at the corners: use a 10.5″ dinner plate as a template to round all four edges. This critical detail prevents fabric from snagging on wheels during turns and creates a professional drape that flows over armrests. When cutting, clip small notches at corner centers to align pieces during sewing—this avoids frustrating shifts when joining layers.
Customize the Neck Opening for Your Head Size
A standard 6.5″ diameter circle centered 12″ from the back edge fits most head circumferences up to 23″. For larger heads, trace an 8.5″ salad plate instead, then taper the back neck seam outward by 1″ to maintain coverage. Mark quarter points around the circle with fabric snips—these guide hood alignment later. Always stitch a basting line along your traced circle before cutting; this prevents accidental over-trimming that creates gaps.
Professional Assembly Techniques for Leakproof Seams
Sew the Body Without Visible Holes
Layer outer and lining fabrics right sides together. Pin within the ¼” seam allowance using Wonder Clips (never regular pins—they leave permanent holes in waterproof materials). Stitch completely around the perimeter, leaving an 8″ gap on the back edge for turning. Clip bulky corners diagonally, then turn right-side-out. Finger-press edges flat before top-stitching ¼” around the entire hem—this closes the gap while reinforcing stress points.
Hood Attachment That Won’t Pull or Gape
Sew outer hood pieces together along the center seam, pressing both allowances to one side. Repeat for lining but press allowances in the opposite direction—this offsets bulk for smoother wearing. Join hood layers right sides together along the curved face edge, then turn and top-stitch. When attaching to the poncho:
1. Fold poncho lengthwise to find center back
2. Align hood back seam to this center point
3. Pin from center back toward front, overlapping hood edges 1″ at center front
4. Stitch ¼” seam just outside your basting line
This offset stitching creates a clean finish that won’t pull when you move your head.
Install Knee-Tuck Snaps for Perfect Lap Fit

Measure and Position Snaps for Wrinkle-Free Coverage
Snaps transform a baggy poncho into a tailored shield. First, measure your wheelchair’s width across leg supports and add 6-8″ for movement ease. Mark snap placement from center front: half your total measurement at hem level, then 2″ up. Test by folding the corner diagonally toward your knee—adjust marks until the fabric lies flat without pulling. Install snaps with sockets facing outward (away from your body). When snapped, the fabric forms a diagonal tuck that hugs your knees without restricting leg movement or creating bunching.
Adapt for Special Chair Features
For tall headrests or motorized chairs, add 1¼ yards of extra fabric to the back panel. Sew this extension 12″ below the neck seam to lengthen coverage without interfering with joysticks or controls. Need cold-weather versatility? Make a reversible fleece version using 1.5-2 yards of double-sided medium-weight fleece—this eliminates lining complexity while adding warmth.
Compact Storage and Long-Term Care
Master the One-Handed Folding Technique
After use, lay the poncho flat and fold in thirds lengthwise (like a letter). Then roll tightly from hood to hem—this creates a 4″ × 6″ cylinder that slips into most wheelchair side pouches. The key? Starting the roll at the hood ensures the heaviest part (neck area) stays compact.
Cleaning Methods by Fabric Type
- Vinyl/oilcloth: Wipe stains with damp cloth, or machine wash cold on gentle cycle. Hang dry—never tumble dry, as heat melts coatings.
- Fleece/flannel: Machine wash cold with mild detergent, tumble dry low. Remove promptly to prevent wrinkles.
- Snap check: Every 3 months, test snap tightness. Loosened prongs can be re-secured by placing the snap on a wooden spool and tapping firmly with a hammer.
Fix These 4 Common Construction Problems
Stop Presser Foot Sticking on Vinyl
When your machine drags fabric, immediately switch to a Teflon or roller foot. No specialty foot? Apply masking tape to your regular foot’s underside—this creates a non-stick surface. Reduce presser foot pressure if your machine allows, and lengthen stitches to 3.5mm to minimize friction.
Eliminate Fleece Seam Puckering
Thick fleece seams pucker when standard tension crushes fibers. Fix this by:
1. Using a walking foot to feed both layers evenly
2. Lengthening stitches to 3.5mm
3. Reducing presser foot pressure (if adjustable)
Seal Neckline Leaks Permanently
Water sneaking through neck stitching needs seam sealing. Apply waterproof tape along the inside neck seam, or brush on liquid seam sealer. Let dry 24 hours before first use—this creates an invisible barrier that won’t stiffen fabric.
Prevent Poncho Riding Up During Movement
If your poncho hikes toward your shoulders, knee-tuck snaps are positioned too wide. Re-measure your chair’s leg width and move snaps 1-2″ closer to center front. Properly placed, snapped corners should create diagonal folds that anchor the poncho to your lap without restricting knee movement.
Your custom wheelchair poncho now delivers what store-bought gear never could: full coverage that moves with you. The knee-tuck snaps eliminate frustrating bunching, the extended hem shields wheels from spray, and the thoughtfully placed neck opening keeps controls accessible. Most importantly, this isn’t just rain protection—it’s reclaimed independence for every weather forecast. With proper care, your handmade poncho will keep you dry through countless adventures, proving that sometimes the simplest solutions (a rectangle of fabric, two snaps, and smart construction) make the biggest difference. Store it rolled in your side pouch, and never let rain dictate your day again.

