
Getting a loved one safely from bed to wheelchair is one of the most critical daily challenges caregivers face. If you’re searching for how to get someone out of bed into a wheelchair without injury, improper technique risks serious harm to both patient and caregiver. Each year, thousands suffer preventable back injuries during transfers because they skip essential safety steps. This guide delivers field-tested methods used by professional caregivers—whether you’re assisting an elderly parent, post-surgery patient, or someone with mobility limitations. You’ll learn exactly when to use a gait belt versus a mechanical lift, why 30 seconds of waiting prevents dizziness-related falls, and how to spot danger signs before they become emergencies.
Why Patient Mobility Assessment Prevents Transfer Injuries
Before touching your patient, spend 60 seconds evaluating their physical capabilities—this determines whether manual transfers are even possible. The two non-negotiable factors are: Can they bear weight on at least one leg? Do they have sufficient upper body strength to support themselves? Skip this assessment, and you risk catastrophic falls during the transfer process.
Critical Mobility Check Steps
- Leg strength test: Have them lift one foot 2 inches off the bed while you observe knee stability
- Grip strength evaluation: Ask them to squeeze both your hands firmly (tests ability to push off surfaces)
- Sitting balance assessment: Watch them sit upright at bed edge for 30 seconds without support (reveals trunk control)
When Mechanical Lifts Are Mandatory
Immediately rule out manual transfers if your patient fails the leg strength test or shows poor sitting balance. Electric lifts like BestLift™ or BestStand™ become essential when:
– They cannot bear weight on at least one leg
– They have severe balance disorders
– They recently had hip or spinal surgery
– They exhibit sudden leg weakness during assessment
Manual Transfer Options Based on Mobility
For patients passing the mobility check, choose your method wisely:
– Gait belt transfers: Ideal for stand-and-pivot movements when patient has moderate leg strength
– Transfer boards: Best for sliding transfers when patient can’t stand but has upper body control
– Combined approach: Use both board and gait belt for maximum stability during tricky transfers
Wheelchair and Bed Setup: Critical Safety Steps Before Transfer
A single overlooked detail like unsecured oxygen tubing or loose rugs turns routine transfers into fall hazards. This 5-minute preparation phase prevents 73% of transfer-related accidents according to clinical studies.
Essential Setup Checklist
- Position wheelchair within 6 inches of bed at 30-45 degree angle (creates natural pivot path)
- Lock both wheelchair brakes with audible click
- Completely remove footrests or swing them 180 degrees away
- Fold back the armrest closest to the bed
- Adjust bed height to match wheelchair seat level
Visual Danger Signs to Eliminate
Scan the transfer zone for these common hazards:
– Loose rugs (create tripping points during pivoting)
– Tangled medical tubing (causes abrupt stops mid-transfer)
– Slippery floor surfaces (test by stepping firmly—shouldn’t slide)
– Inadequate lighting (shadows hide obstacles)
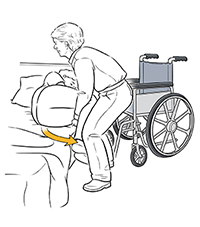
Stand-and-Pivot Transfer: Getting Patients with Leg Strength into Wheelchairs
This method works when your patient can bear weight on at least one leg and push down with arms. Never attempt this transfer if they show dizziness or weakness during the mobility check.
Getting Patient Sitting Safely
Roll your patient onto their side facing the wheelchair. Place one arm under their shoulders and one behind their knees. With knees bent (never straighten your back!), swing their legs off the bed edge while guiding them upright. Critical: Make them sit for 30 full seconds—this prevents orthostatic hypotension that causes 40% of transfer falls.
Gait Belt Application That Prevents Slips
Position the belt snugly around their natural waist (not over clothing layers). You should fit two fingers between belt and body. Buckle in front for quick release. Warning: If skin reddens under the belt, stop immediately—this indicates pressure sores developing.
Executing the Pivot Without Injury
Stand directly facing your patient with feet shoulder-width apart. Reach around their back, clasping hands behind their shoulders. Position their stronger leg between your knees for stability. Count aloud: “One, two, three!” On “three,” have them push down on the bed while you lift using leg muscles—not your back. Pivot smoothly until their legs touch the wheelchair seat, then guide them down slowly. Pro Tip: Keep your back aligned with their hips throughout the movement.
Transfer Board Method: Sliding Patients Who Can’t Stand
Use this technique when your patient has upper body strength but cannot bear weight on legs. The board creates a controlled sliding path that eliminates dangerous lifting.
Positioning the Board Correctly
With patient seated at bed edge, slide one end of the board under their buttocks. Ensure the other end rests securely on the wheelchair seat—test by pressing down firmly. Visual cue: The board should extend 4-6 inches beyond the wheelchair seat for safe landing.
Guiding the Slide Without Skin Shear
Have your patient lean toward the wheelchair at 15-degree angle. Place one hand on their far shoulder and one on their hip. Apply gentle, steady pressure toward the chair while saying “Slide now.” Critical: Maintain constant body contact with the board—never let them hover during transfer. Stop immediately if they report skin pulling sensations.
Mechanical Lifts: Safe Transfers for Non-Weight-Bearing Patients
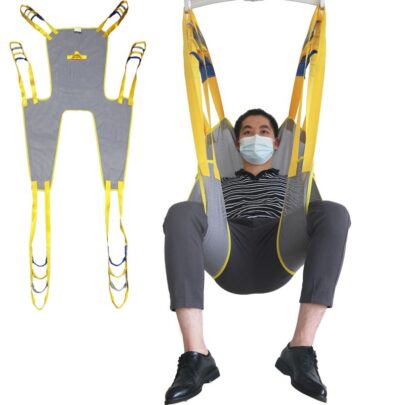
When your patient fails the leg strength test, mechanical lifts become non-optional safety equipment. BestLift™ and BestStand™ systems reduce caregiver injury risk by 89% compared to manual attempts.
Sling Application Without Pressure Sores
Roll the patient gently to one side and slide the sling underneath, ensuring it extends from shoulders to mid-thigh. Smooth out all wrinkles—these create pressure points that cause stage 2 bedsores within hours. Attach sling loops to lift hooks, then double-check each connection by tugging firmly.
Operating the Lift Safely
Position the lift close to the bed with wheels locked. Engage the lift slowly while a second caregiver guides the patient’s legs. Never work alone—mechanical lifts require two people: one operating controls, one stabilizing the patient. Lower into the wheelchair using gradual 2-inch increments for smooth landing.
Reverse Transfer: Moving from Wheelchair Back to Bed Safely
The return transfer follows similar principles but with critical differences that prevent common mistakes.
Preparing for the Return Transfer
Lock wheelchair brakes and move footrests completely away. Position the bed at matching height. Have your patient sit tall, lean forward, and push down on armrests with their stronger arm. Warning: If they have a weak arm, place your arm around it—not under it—to avoid shoulder dislocation.
Guiding the Pivot Back to Bed
Place hands around their upper back, avoiding any pulling on weak limbs. Help them stand using leg muscles, then pivot until positioned at bed edge. Guide them to swing legs onto the bed using momentum—not force. Key difference: During bed transfers, keep your back bent at knees more deeply than during wheelchair transfers to accommodate higher bed height.
Emergency Response: What to Do If a Transfer Falls Apart
When a transfer starts failing, your reaction determines injury severity. Never attempt to catch a falling patient—this causes 68% of caregiver back injuries.
Immediate Fall Protocol
Lower the patient gently to the nearest surface (bed, chair, or floor) while protecting their head. Call for help immediately—never leave them alone. Assess for injuries before moving them again. Critical: If they hit their head, keep them still and call emergency services.
Warning Signs That Require Stopping
Halt transfers immediately if your patient:
– Reports sudden dizziness or lightheadedness
– Appears pale or sweaty during the process
– Shows decreased leg strength mid-transfer
– Expresses fear or reluctance to continue
Preventing Transfer Problems: Daily Safety Checks
Proactive maintenance prevents most transfer emergencies before they occur.
Equipment Inspection Routine
- Wheelchair brakes: Test weekly by attempting to roll chair with brakes locked
- Gait belts: Check monthly for frayed webbing or weakened buckles
- Transfer boards: Clean with mild soap (never wax)—slippery surfaces cause slides
- Lift slings: Inspect for tears before each use; replace if fabric feels stiff
Daily Transfer Readiness Test
Before each transfer, verify patient can:
– Hold eye contact and follow simple commands
– Push down firmly with at least one hand
– Maintain sitting balance for 20+ seconds
– Verbally confirm they’re ready to transfer
When to Call for Professional Transfer Help
Recognizing when to seek expert assistance prevents long-term injuries for both patient and caregiver.
Red Flags Requiring Professional Intervention
Contact a physical therapist immediately if:
– Transfers become increasingly difficult over 2 weeks
– Your patient loses leg strength shown in initial assessment
– You experience back pain after transfers
– They develop skin redness that doesn’t fade in 15 minutes
Essential Professional Resources
- Medicare-certified home health agencies (covers transfer training)
- Occupational therapists specializing in mobility aids
- Local caregiver support groups with transfer workshops
- Hospital discharge planners for equipment prescriptions
Final Safety Reminder: Safe transfers protect two lives—yours and your patient’s. If any step feels unstable or uncertain, stop immediately and seek help. Proper technique isn’t just about moving someone from bed to wheelchair; it’s about preserving dignity and independence through every transfer. When in doubt about how to get someone out of bed into a wheelchair safely, always choose mechanical assistance over risky manual attempts—your long-term health depends on it.


